This post may contain affiliate links. I only recommend products I use and love. Read the full disclosure here
Updated on: March 21, 2019
Originally published on: March 16, 2019
If you drive, it is almost guaranteed that at some point you will have a flat tire. While technology today allows you to call for help, sometimes it is much faster (and cheaper) to change the flat yourself. Yet a surprising number of people do not know how to change a flat. Below are the steps you need to follow in order to change a flat tire safely.

1. Pull Over at a Safe Spot
As soon as you notice that you have a flat tire, the first thing you need to do is find a safe spot to pull off of the road. If you are on a highway, taking the next exit is the safest bet. If not, pull as far onto the shoulder as possible, making sure you are on a flat surface. Never park in the middle of a curve, or on a hill. Always set the parking brake, and if you have a manual transmission, leave your car in gear.
2. Turn on Your Hazards
Make sure you turn on your hazard lights and engage your emergency brake before leaving the car. If it’s at night and you have flares, this is a good time to make use of them. Grab your owner’s manual before heading to the trunk and removing all of the items you will need to change the tire. This includes the spare, the jack, the lug wrench, bracing materials (wheel wedges, bricks or pieces of wood) and a flashlight if needed.
3. Secure the Car and Loosen the Lug Nuts
Begin by placing the bracing materials behind and in front of one of the tires that will not be lifted by the jack. So if you’re changing a rear tire, place these in front of and behind one or both of the front tires. If your flat tire is at the front, put the wheel wedges in front of and behind the rear tires. This will help prevent the car from rolling and will also to increase stability.
Before you can loosen the lug nuts, you may need to remove the hubcap or wheel cover. Using the flat end of your lug wrench to remove the hubcap will work for most vehicles, but some hubcaps may need a different tool to come off. Look in your owner’s manual for proper hubcap or wheel cover removal procedures.
At this point you will not want to completely remove the lug nuts, but instead simply loosen them by turning the wrench to the left (counter-clockwise) about ¼ to ½ of a turn. If the lug nuts are really tight, try placing the wrench on the nut and standing on the wrench arm. You can also try hitting the wrench arm with a rock.
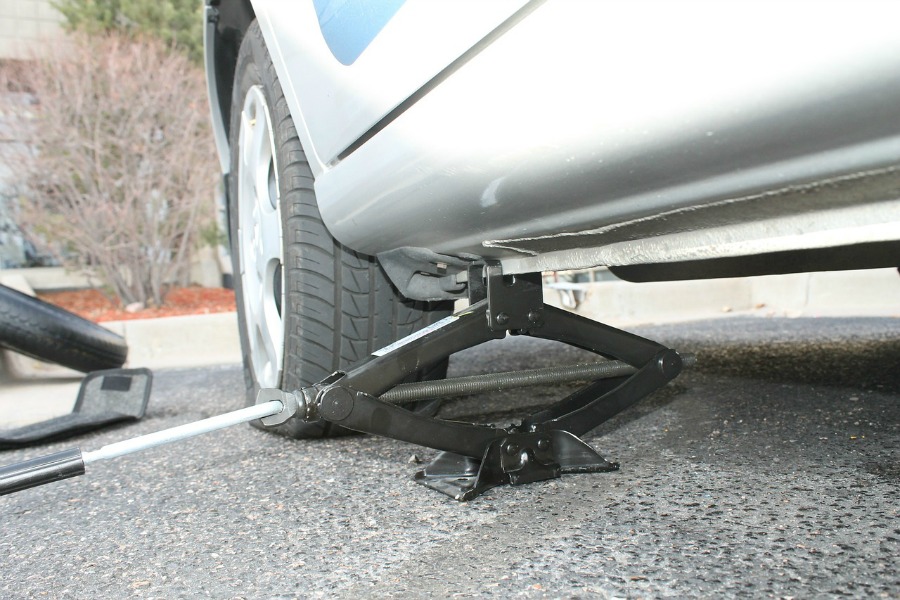
4. Place the Jack Under the Vehicle
To safely lift and avoid damage to the car, consult your owner’s manual regarding jack placement. This is usually beneath the vehicle frame alongside the tire that is flat. In fact, most vehicle frames have an obvious indention or area of exposed metal that is made specifically for a jack.
5. Raise the Vehicle Using the Jack
Once the jack is correctly positioned, slowly raise the car until the flat tire is approximately six inches off the ground. It’s extremly important that you remember to never put any part of your body under the vehicle while raising it or once it is raised on the jack.
6. Unscrew the Lug Nuts
Once the car is raised, you can finish removing the lug nuts the rest of the way. Since you’ve already loosened them a bit, you should be able to finish removing mostly them by hand.
7. Remove the Flat Tire
Holding the flat tire by the treads, gently pull it towards you until it is completely free of the hub behind it. Avoid yanking it or pulling it hard as you don’t want to risk shaking the car too much and knocking the jack out from under the car. Once the tire is off, set it on its side so it doesn’t roll away.
8. Mount the Spare
Next, place the spare tire on the hub by lining up the rim with the lug bolts. Push gently until you see the lug bolts showing through the rim.
9. Secure Tire to Car by Tightening Lug Nuts By Hand
Place the lug nuts back on the lug bolts and tighten them as much as you can by hand. Once all the lug nuts are on, check each one once again, tightening as much as possible. Avoid tightening them with the wrench until the car is lowered back on the ground.
10. Lower the Car and Tighten Lug Nuts
Use the jack to slowly lower the vehicle until the spare tire is resting on the ground, but the full weight of the car is not yet fully on the tire. At this point, you will need to finish tightening the lug nuts with the wrench, turning clockwise. Get the lug nuts as tight as you possibly can. I;ve found that pushing down on the lug wrench with the full weight of your body to ensure they are very tight works well.
11. Finish Lowering the Car
Once you have the lug nuts as tight as you can get them, lower the vehicle all the way to the ground. Remove the jack, and give the lug nuts one more pull with the wrench to ensure they are as tight as possible.
12. Replace The Hub Cap
If the hubcap you took from the flat tire will fit your spare, go ahead and put it in place the same way you removed it. If it doesn’t fit, don’t worry about it. Simply put it away with the tire when you stow your equipment.
13. Stow the Equipment
Make sure you stow away everything you used, along with the flat tire. This includes the jack, the lug wrench, the wheel wedges, the flat tire, and possibly the hubcap if it wouldn’t fit on the spare.
14. Check the Spare Tire’s Pressure
Always check the pressure of the spare tire before leaving to make sure it is safe to drive on. In a perfect world, the spare will be fully inflated since you checked it as part of your easy routine car maintenance tips. If the tire needs pressure, slowly drive to a service station immediately and add air to the tire.
15. Take the Flat Tire to a Technician
Keep in mind that temporary spare tires are not made to drive long distances or at high speeds. Drive slowly and cautiously to the closest tire technician. Many dealerships, such as Zeigler Ford of North Riverside, have professionals that can help you determine whether your tire can be repaired or if it needs to be replaced.
Deanna R. Jones
Tuesday 7th of July 2015
Thanks for the tips! I had a flat tire the other day. My car had a spare tire in the back, but I still had to call a tow truck, because I didn't know how to change a flat. Hopefully, these tips will change that so that I'll be prepared the next time I get a flat tire. It's a good thing that you made a note to place bracing materials behind and in front of one of the tires that will remain on the ground while the rest are lifted by a jack. That seems like something important to remember to keep the car stable while I'm changing a tire.