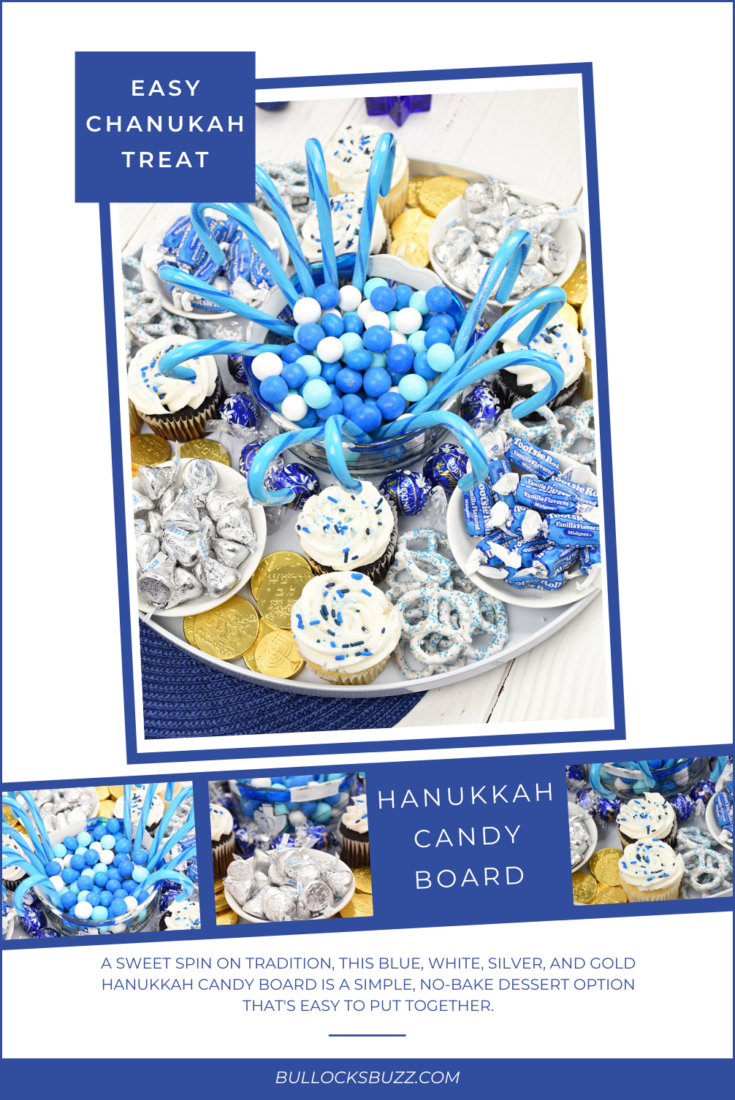
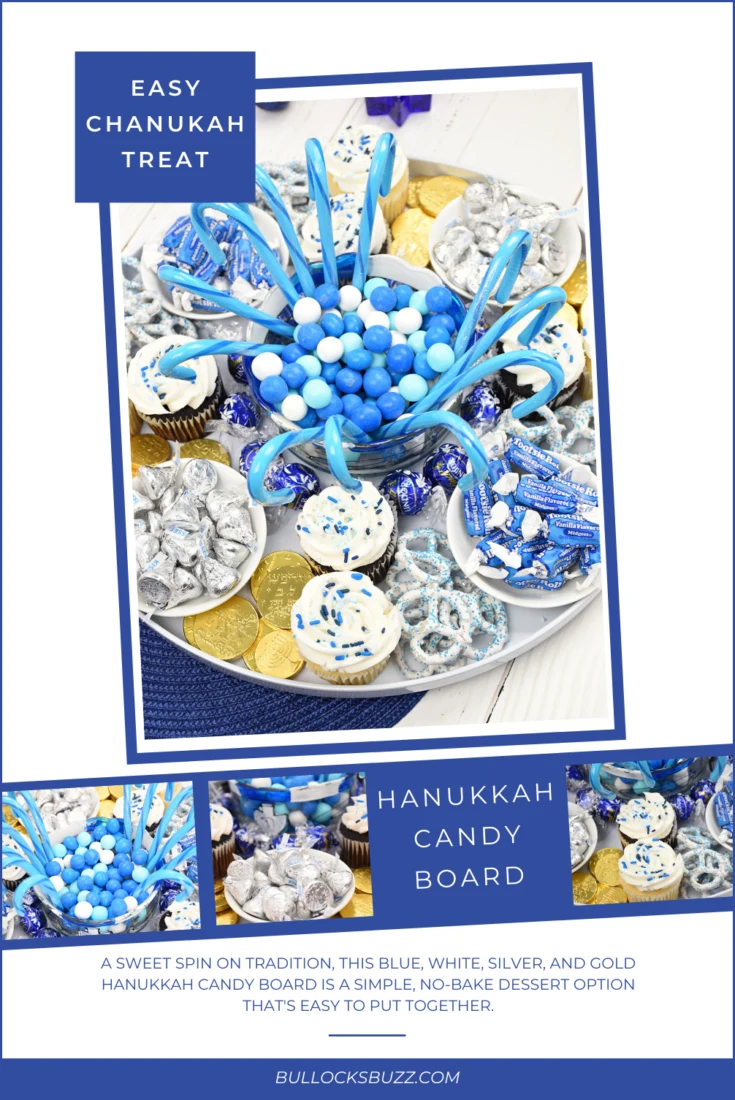
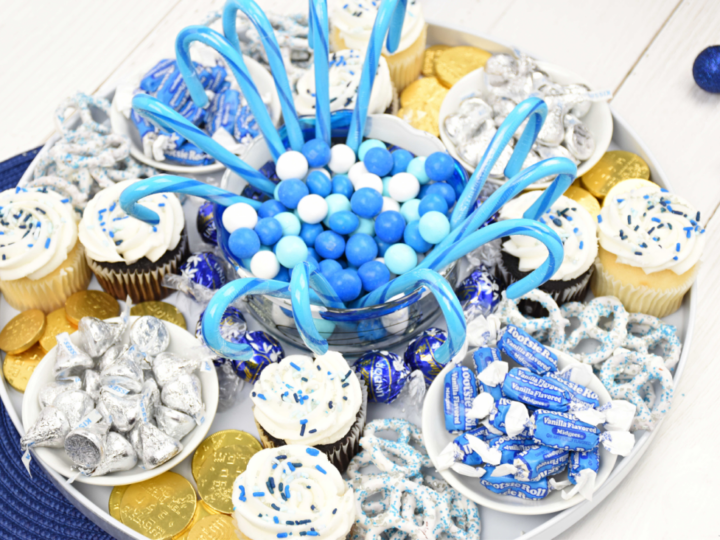
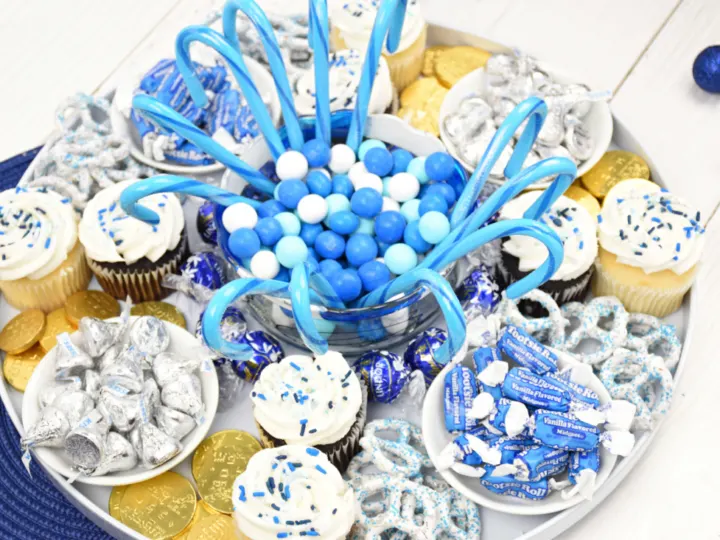
A sweet spin on tradition, this blue, white, silver, and gold Hanukkah Candy Board is a simple, no-bake dessert option that’s easy to put together.
Finding blue and white Hanukkah treats can be a bit difficult during the holidays where all you see is red and green. But I’ve found some creative ways to use what’s around to create this beautiful Hanukkah Candy Board.
This sweet confection concoction is a true no-bake dessert. There’s no need to turn on an oven or grease any pans or dirty up any dishes to make it happen (with exception of the pretzels I made).
Best of all, a Hanukkah dessert tray is super easy to make, and will be something any child or adult would be thrilled to see at their Hanukkah celebration.
So, after you light the candles and say the blessings, serve family and friends this festive dessert board filled with blue and white, silver and gold treats for a sweet surprise.
HOW TO MAKE A HANUKKAH CANDY BOARD
Making a Hanukkah candy board is very easy. All you need is a variety of sweets and treats in your choice of Hanukkah colors and a board.
While there is no right or wrong way to make a Hanukkah candy board, below I share some tips on how I made this one. Feel free to copy mine or use it as inspiration to create your own.
And if you need more inspiration, check out some of my other boards like this New Year’s Eve Board, or my Halloween Candy Board, this Easter Dessert Charcuterie Board, my St. Patrick’s Day Dessert Tray, or this Valentine’s Day one.
MAKING A HANUKKAH CANDY BOARD IN FIVE STEPS
Disclosure: This blog post contains affiliate links for products or services I think you’ll like. This means if you make a purchase from one of these links, Bullock’s Buzz will make a small commission at no additional cost to you. I only recommend products that I use and love.
STEP ONE: SELECT YOUR BOARD
Before you get started you need to pick out the type of tray or board you are going to use. While you can use any shape you want, you’ll want to make sure that there are no beveled or raised edges like a dinner plate has. This will prevent the sweets from sliding or rolling out of place.
I choose to use a round tray, or rather a Lazy Susan. The fact that it rotates makes picking out the treats you want easy! This one is fairly large, at 14 inches. And it is one of my favorites! You can get it on Amazon.

STEP TWO: CHOOSE YOUR COLOR SCHEME
The next step in making your Hanukkah Candy Board is to choose the colors you want to use. I opted for blue, white, silver, and gold, but you can use whatever colors you want. Want a blue and gold Hanukkah? Purple and silver? Go for it! You do you.
STEP THREE: PICK OUT YOUR SWEETS AND TREATS
Finally, the fun part – picking out the candy and other sweets! I do have one tip: before you head to the store or begin ordering online, poke around in your pantry. Are there any leftovers from this year’s Halloween stash that would work? What about any treats you keep on hand? Do you want to add a quick and easy homemade treat such as these Hanukkah Chocolate Covered Pretzels?
TIP – like I mentioned earlier, it can be hard to find Hanukkah colored treats in your local stores, but if you type in Blue and White Candy on Amazon, you’ll be surprised at all the tasty treats that come up!
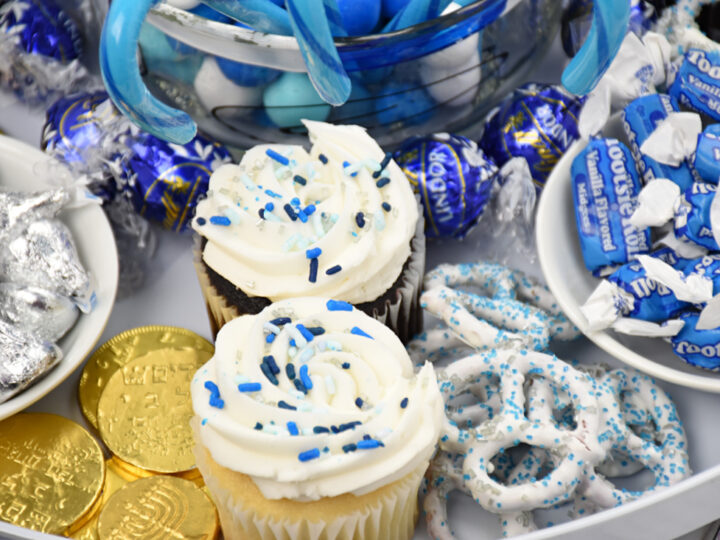
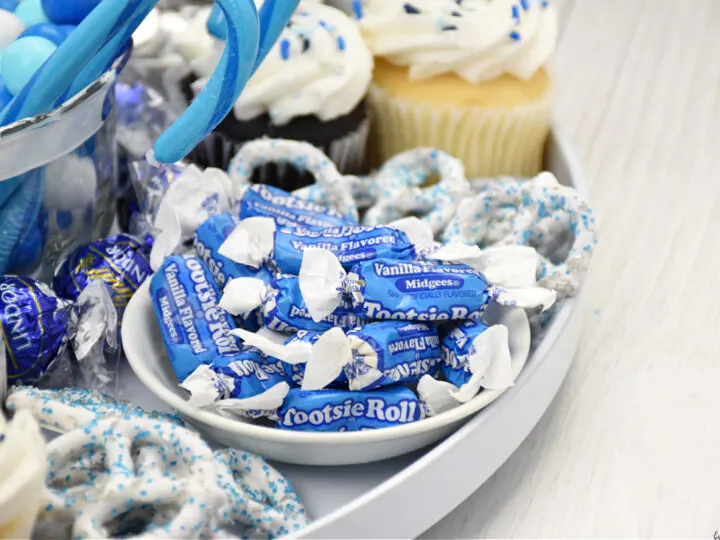
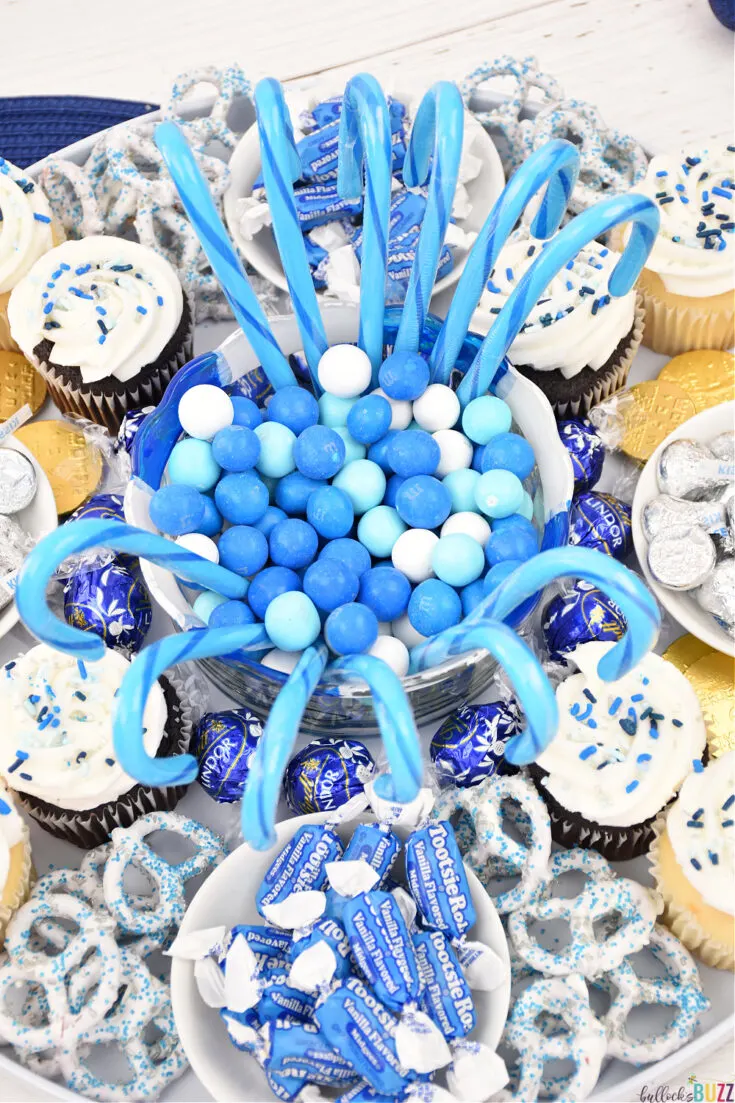
Here is a list of the items that I used on my Hanukkah dessert board. I found everything at Walmart and CVS, but I linked to the same things on Amazon if you want to order online.
- Hanukkah Pretzels – grab the quick and easy recipe via the link above! Or use ones from your grocery
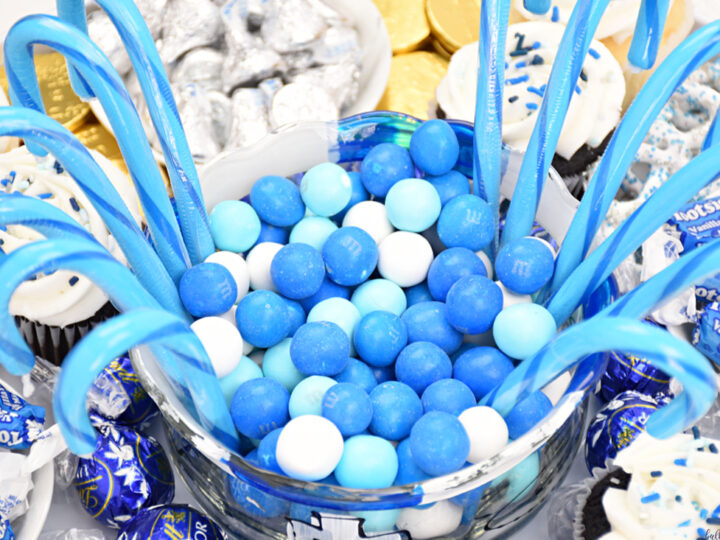
- Blueberry Candy Canes
- Lindt Lindor Dark Chocolate Truffles
- Cupcakes – from Walmart on which I added blue and silver sprinkles
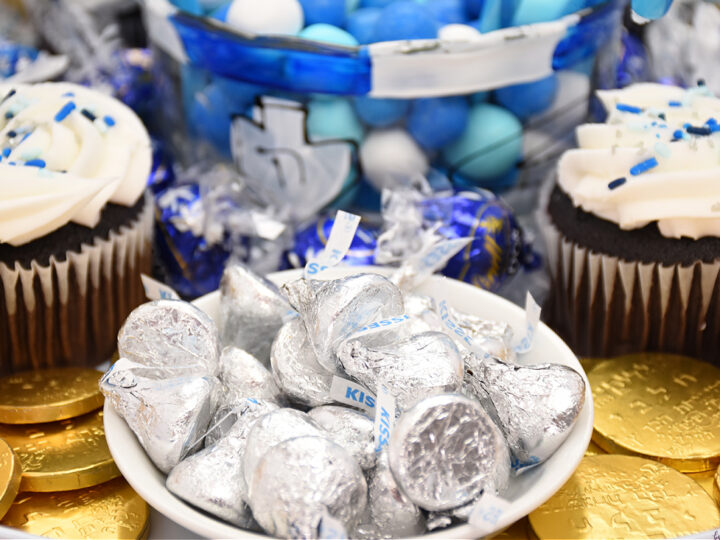
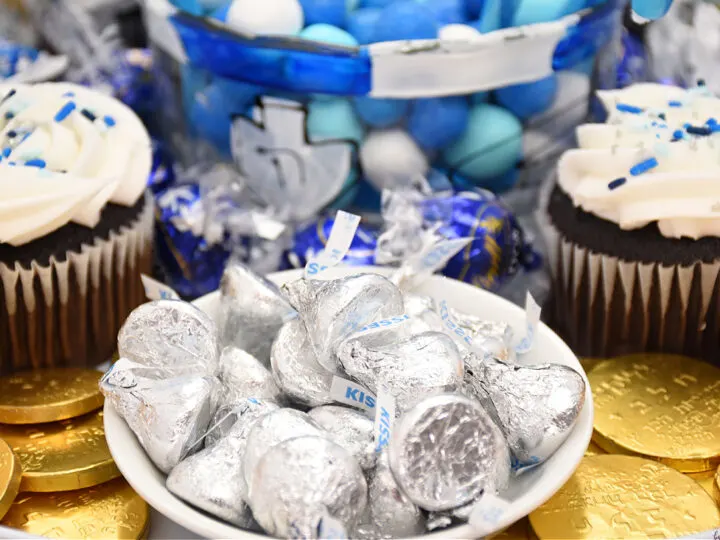
- Hershey’s Kisses
- Tootsie Roll Midgees
- Pretzel Snowballs Holiday M&M’s – found at Walmart, but Amazon has blue and white
- Gelt

STEP FOUR: ARRANGE YOUR BOARD
This is the part that takes the longest and includes a bunch of trial and error. Again, there is no correct or incorrect way to arrange your board. Just arrange and rearrange until you’re happy with how it looks. Here are some tips to help you out:
- Start with some type of centerpiece then build out from there. I opted to fill a cute Hanukkah candy bowl with M&MS and then stick candy canes in around the edges.
- Next, add a few smaller bowls or ramekins evenly spaced around the tray to put smaller candy in. Here I put Kisses and Midges into round ramekins. If you have any fun-shaped ones now is the time to use them!
- Once you have the ramekins in place, put down any larger items you have like I did with the cupcakes. Place these in various sections around the board.
- Lastly, sprinkle in the smaller items in between to fill in any empty spaces. I used pretzels, truffles and Gelt.
Don’t be discouraged if it looks a little wacky at first. Rearranging is totally part of the process. The most important thing is that you have fun with it!

STEP FIVE: SERVE AND ENJOY
Now all that is left is to decide when and where to put your Hanukkah Candy Board out, and to enjoy! Pro Tip: if serving at a party, put some servings spoons/scoops and treat bags next to your board to keep things sanitary and so guests can fill goodie bags to take home.

LIKE IT? LOVE IT? SHARE IT!
I hope you enjoy this Hanukkah Candy Board as much as I did! It’s so easy to make, and lots of fun to eat! If you give it a try, I’d love to know! Leave a comment below and tag a photo @bullocksbuzz and #bullocksbuzz on Instagram or Facebook so I can see your Festival of Lights creations!