This post may contain affiliate links. I only recommend products I use and love. Read the full disclosure here
Updated on: May 18, 2026
Originally published on: June 28, 2017
In the past, Google had several different communication tools for instant messaging, voice, and video calls – but all that changed with the introduction of Google Hangouts, which consolidated all three into a single platform. With everything under one roof, Google Hangouts has made it more convenient than ever to place calls, hold video conferences, and much more.
The one weakness of Google Hangouts (and indeed most other voice or video call tools) is that any calls made aren’t saved. As such it isn’t possible to refer to content of a call, as it would be with instant messaging.
While Google Hangouts may not have this feature built-in, it is possible for you to implement it yourself in a fashion – by recording your calls using Movavi Screen Capture. Because it is able to record video footage from your screen along with audio from your speakers and a microphone, you can effectively use it to record voice or video calls made on Google Hangouts.
Although that might sound like a bit of a handful, it is actually really easy to learn how to record a Google Hangout call session with Movavi Screen Capture. To get started just launch it and choose the ‘Record screen’ option in the menu that appears.
At first you’ll have to define the area of your screen that you want to capture by either drawing it using your mouse cursor or selecting a window. Once you do the panel will appear, and you can check to make sure the ‘System Audio’ and ‘Microphone’ icons are highlighted so that Movavi Screen Capture records the audio from both.
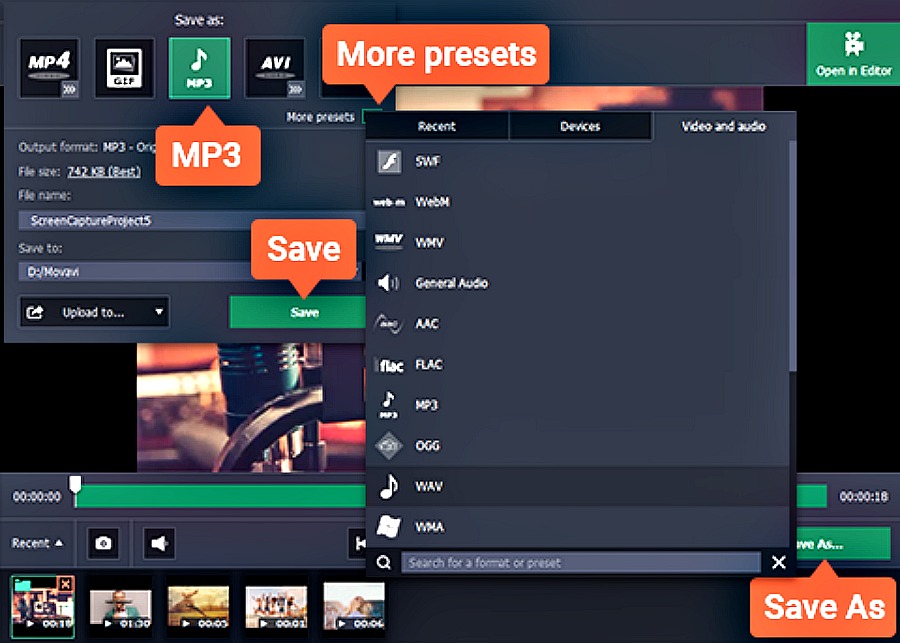
That is really all that you need to set up – though you could also adjust the frame rate, volume levels, alter the destination folder, or set up Movavi Screen Capture to record keyboard and mouse actions. The recording itself can be controlled either with the on-screen controls in the panel or the built-in hotkeys. After you stop the recording, it will automatically be saved to the destination folder in MKV format – though you can opt to save it in any other format if you prefer.
Before saving it, Movavi Screen Capture will let you trim out any parts you don’t need. All you need to do is isolate the unwanted segment by moving the marker and using the ‘scissors’ icon to split it. Once the segment is isolated, click on it to select it and click the ‘trash can’ icon to delete it.
As you can see, it isn’t difficult to set up, start recording, and save Google Hangouts calls using Movavi Screen Capture. The fact that it is so easy and can be set up so quickly makes it a very feasible option if you’d like to keep any voice or video calls stored for future reference.