
This post may contain affiliate links. I only recommend products I use and love. Read the full disclosure here
Updated on: February 14, 2025
Originally published on: December 23, 2023
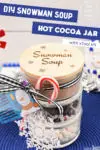
Spread the magic of the holidays with my latest DIY adventure – a Snowman Soup Hot Cocoa Jar, crafted with love and a touch of laser precision! Discover how you can create this heartwarming gift, complete with a special poem to spread the joy!
(Get the free SVG file and Snowman Soup Poem printable below).

Season’s Greetings, Craft Lovers! Christmas is almost here and there’s still time to craft some more joy and warmth. If you are looking for a great homemade gift or a last-minute present, I’ve got you covered!
Today, I’m beyond excited to share a special DIY project that’s not just a festive treat but also a gift that keeps on giving – my DIY Snowman Soup Hot Cocoa Jar.
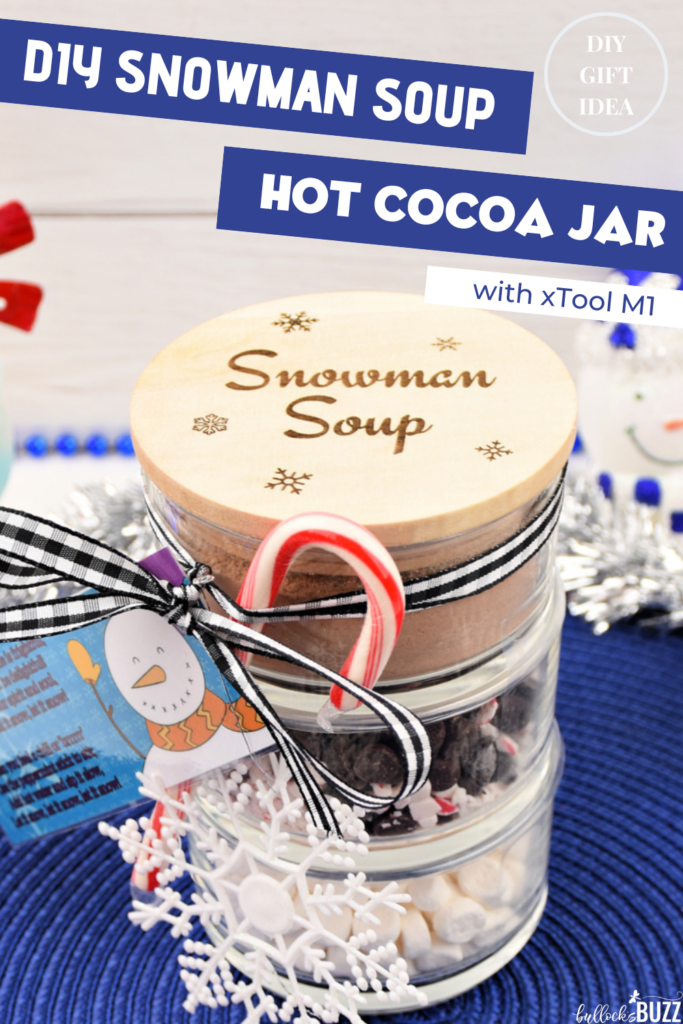
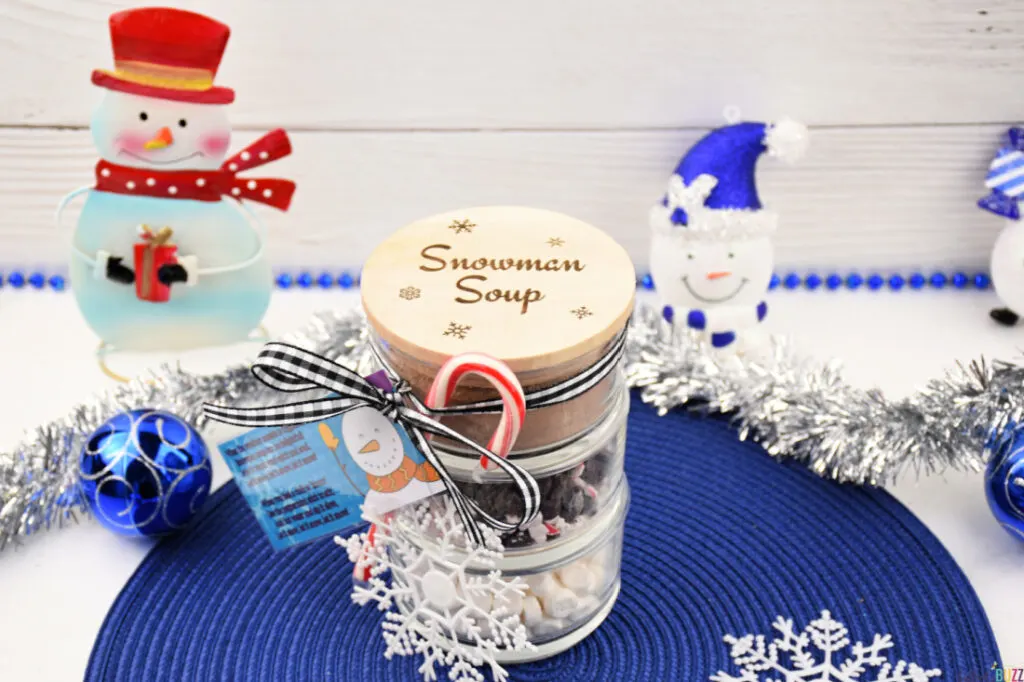
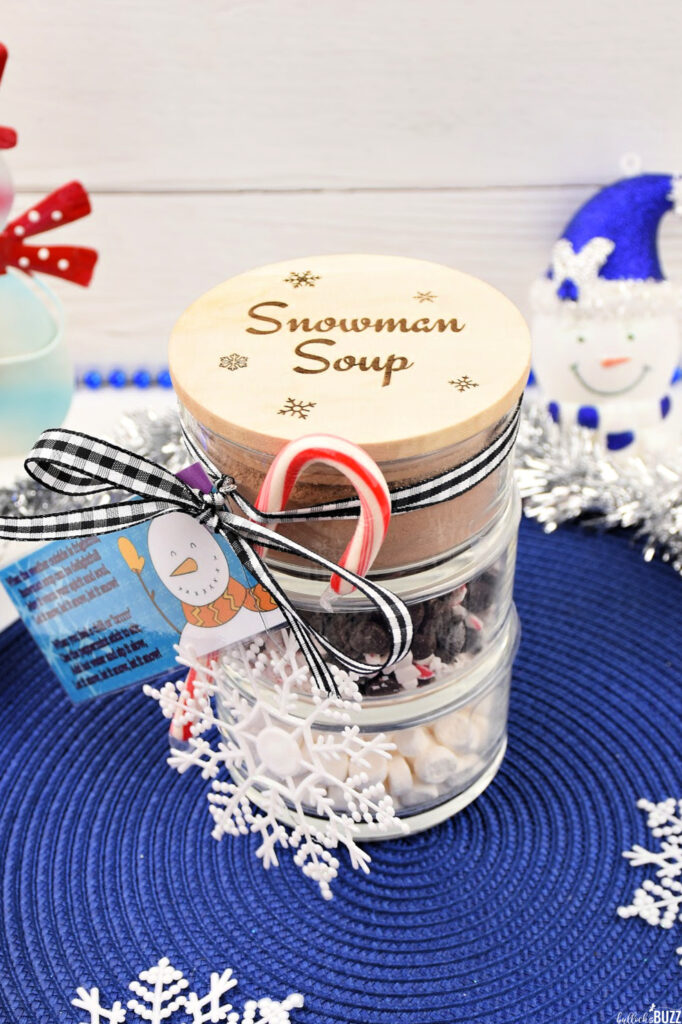
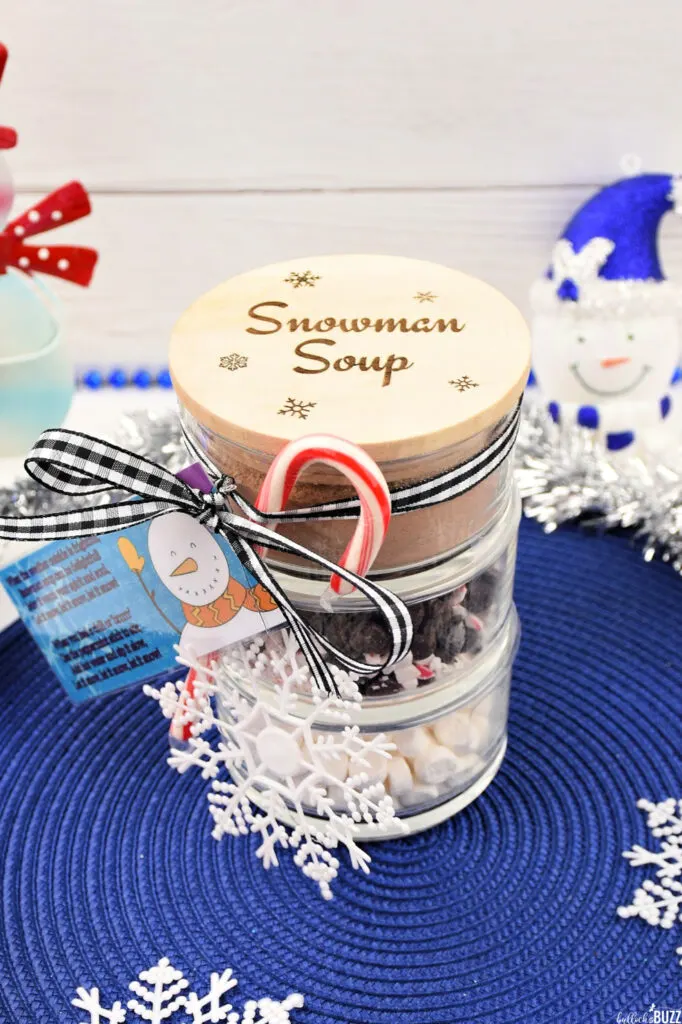
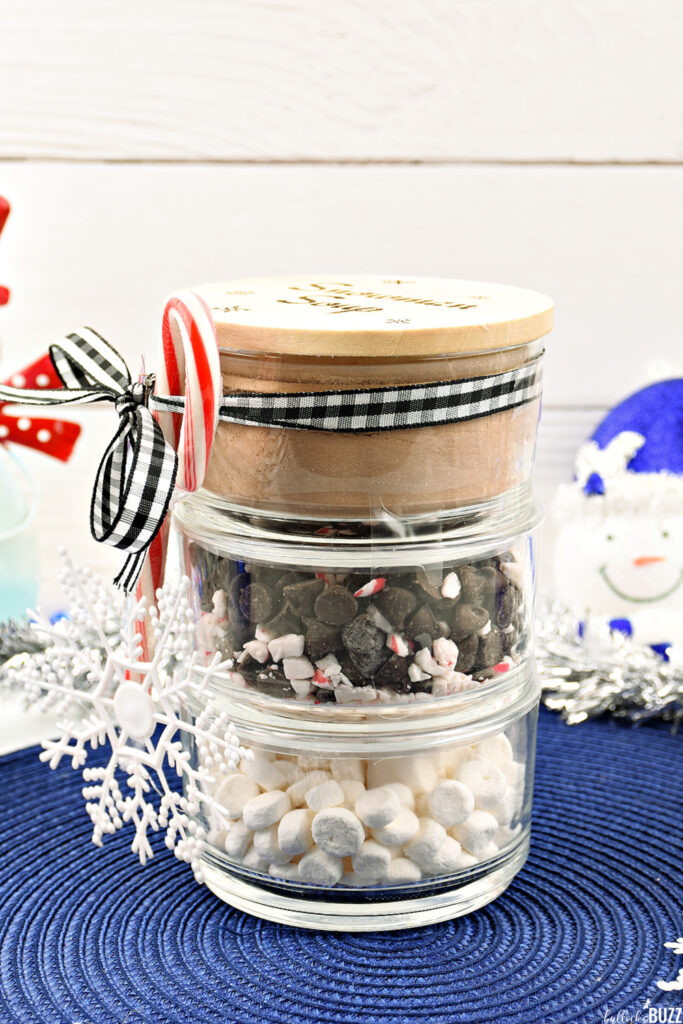
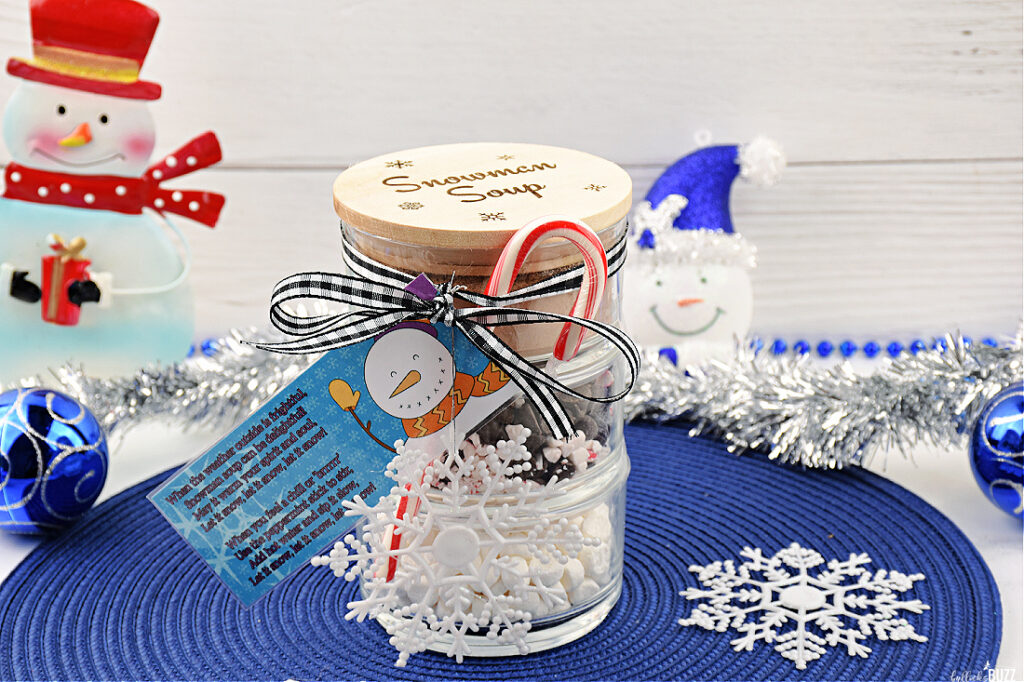
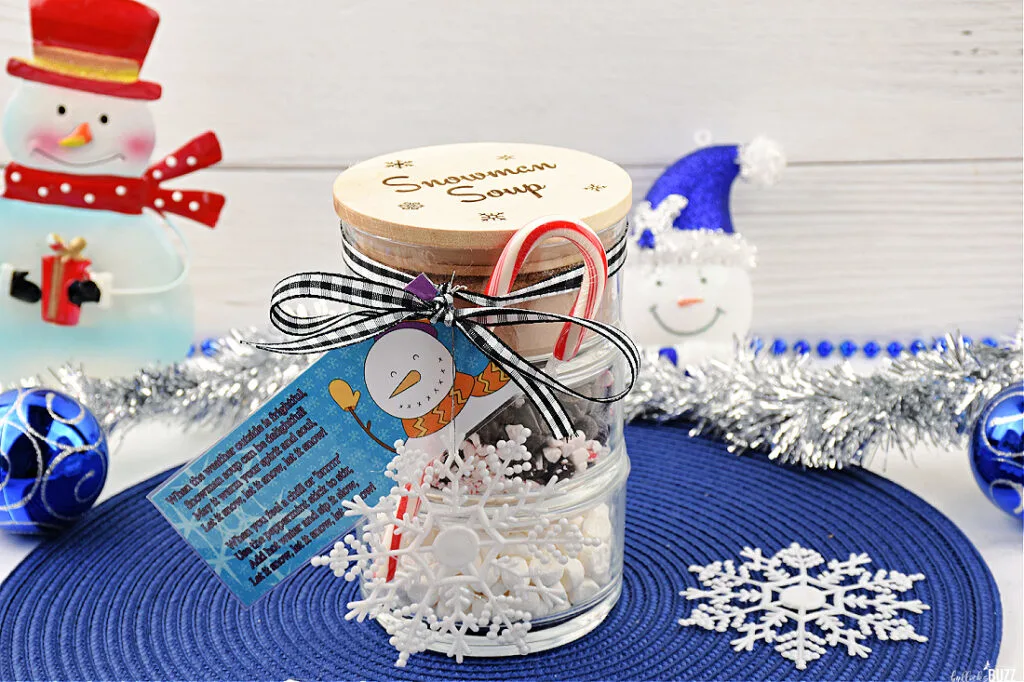
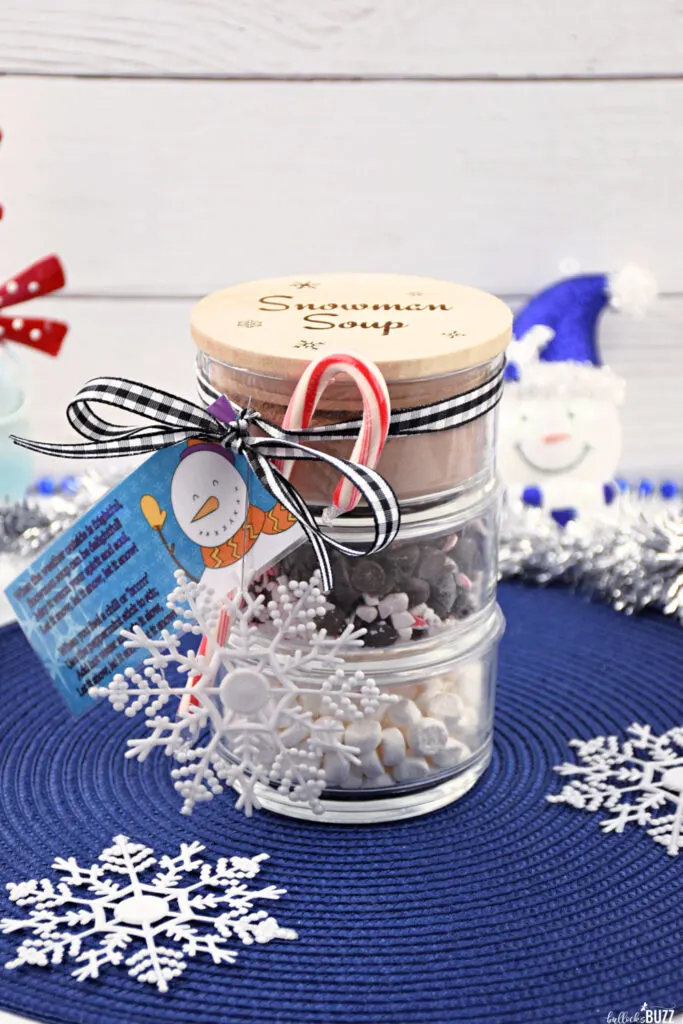
This isn’t your ordinary holiday craft; it’s a stacked wonder that brings joy in layers! Created with a set of stackable jars I found at Dollar General, this adorable DIY holiday gift is filled with my homemade hot cocoa mix, mini marshmallows, and chocolate chips mixed with peppermint bits.
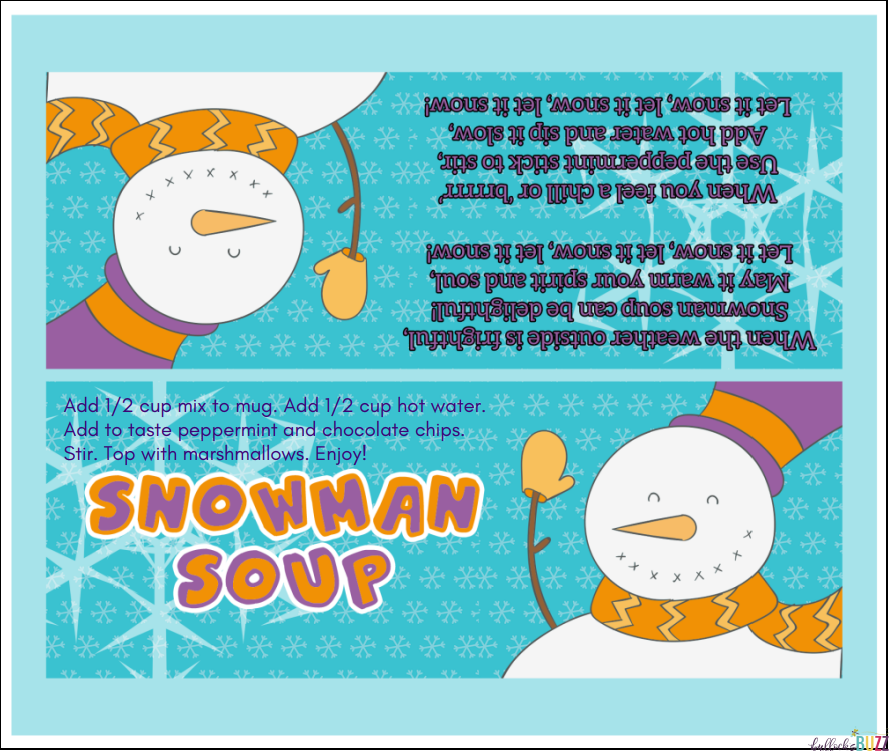
It’s all tied together with an adorable Snowman Soup poem and topped off with a snowflake ornament and a candy cane for stirring those delicious cups of hot cocoa! Free printable Snowman Soup poem download and SVG file for the lid below – keep reading!

This adorable homemade holiday craft is not just a gift; it’s a warm hug in a jar! And one you can use over and over even after the hot cocoa mix is gone!
My First Project with the xTool M1
Creating this DIY Snowman Soup Hot Cocoa Jar was not just about crafting a unique gift for the holidays, it was also my very first project created with my new xTool M1!


Using the xTool M1 was much easier than I thought it would be. Yes, it took me a few tries to get my lids to turn out the way I wanted as I had to experiment a bit with the settings. But once I figured it out, it was smooth sailing. And I love how they turned out!
You can learn more about my xTool M1 laser engraving and cutting machine in my upcoming review [here]!
xTool is running a huge sale on all their lasers until Christmas! Use this link to save an additional $80 off your purchase of $999 or more! Discount will be automatically applied.

How To Make Snowman Soup Gift Jar
This DIY holiday gift idea is an affordable Christmas craft or Haunkkah craft that doesn’t just dazzle; it warms the heart and the belly! It’s everything you need to cook up a few mugs of homemade hot cocoa that’s perfect for those cold winter days and nights. Plus, the jars can be used over and over again.
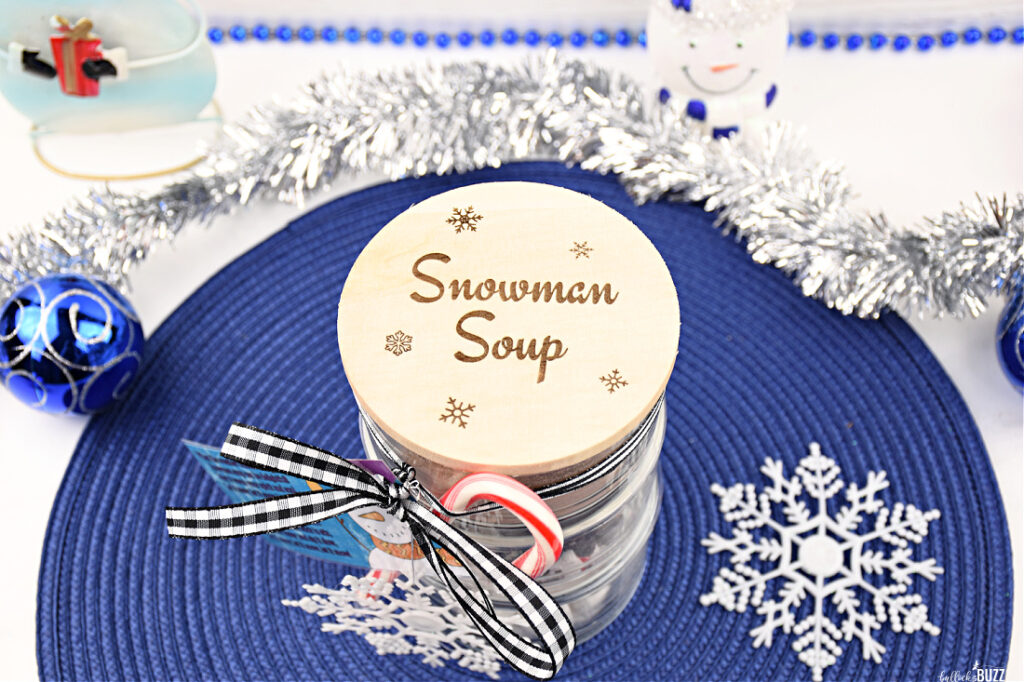
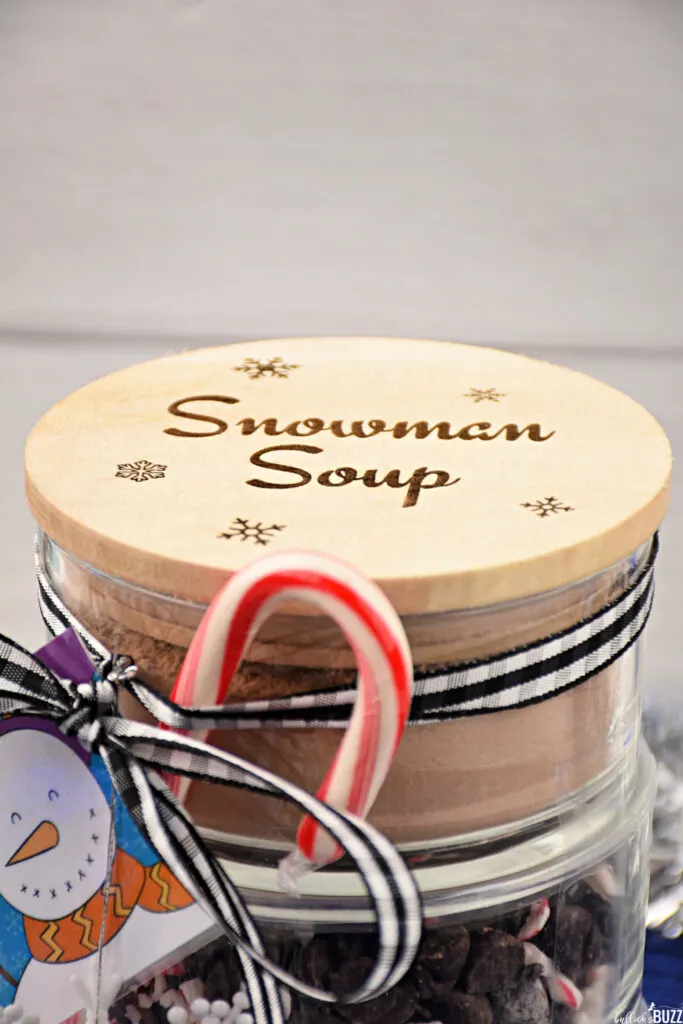
But what makes this homemade holiday gift extra unique is the custom-engraved wooden lid. Using my new xTool M1, I laser engraved the words ‘Snowman Soup’ surrounded by snowflakes. And y’all, it turned out SO cute!
No laser engraver? No worries! I’ve added some suggestions for you so you can still make this holiday craft turn out just as cute. Keep reading!
If you are ready to create some holiday magic then let’s jump right into the frosty fun of creating this delightful gift!
Disclaimer: This blog post contains affiliate links for products that’ll sleigh your holiday crafting game. If you make a purchase through these links, I might earn a small commission at no extra cost to you. As always, I only endorse products that I have (or have had), use, and love.
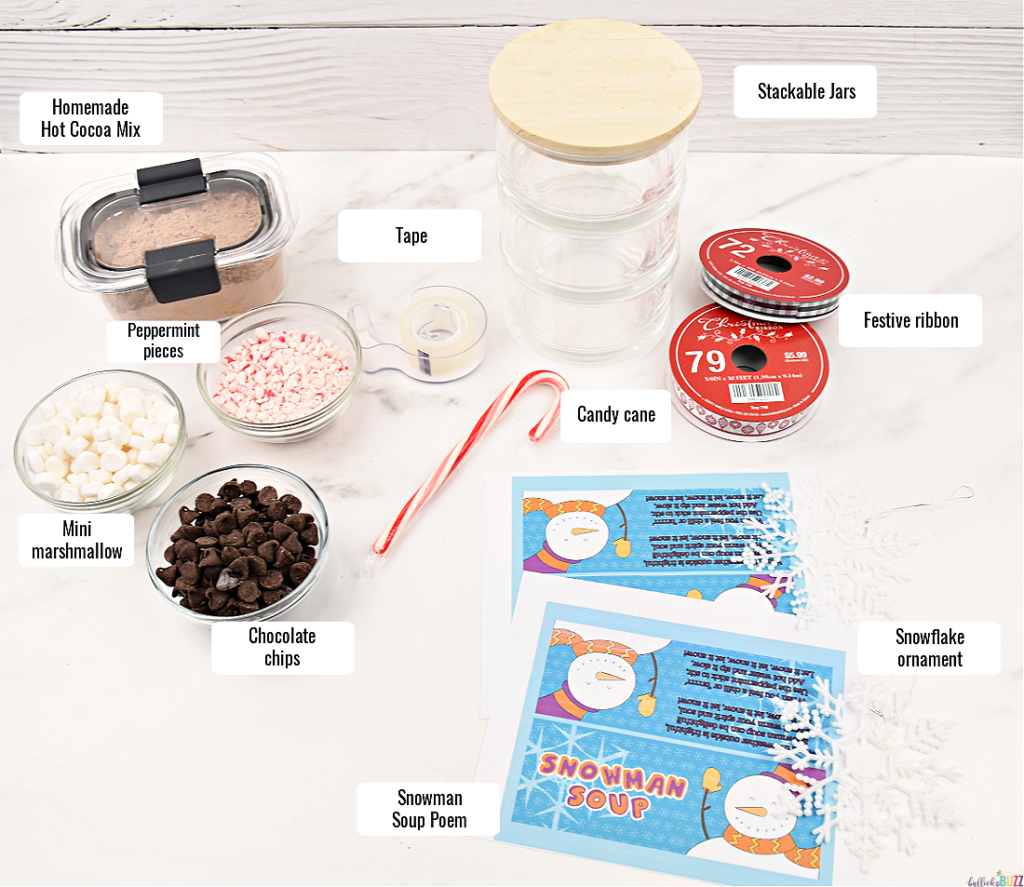

Supplies You Will Need
Did I mention that this craft cost less than $20 to make? Here are the jolly little goodies you’ll need to bring your DIY Snowman Soup Gift Jar to life!
- Stackable Jars: I got my 3-tier jar with wood lid at Dollar General for just $5, perfect for this project. Amazon and Etsy also have some, but they are more expensive.
- xTool M1 Laser and Cutting Machine: For that personalized touch on the wooden lid. Other options are below.
- Homemade Cocoa Mix: The base layer of our Snowman Soup. Here’s the hot chocolate mix recipe I used.
- Dehydrated Mini Marshmallows: Regular mini marshmallows will work, too!
- Chocolate Chips: For an extra chocolatey taste! I used semi-sweet chocolate chips.
- Crushed Peppermint: For a cool pepperminty twist! You can also crush your own mini candy canes.
- Festive Ribbon: To tie the jars together and dress them up beautifully.
- Snowman Soup Poem and Instructions: Download and print yours [see link below]!
- Plastic Snowflake Ornament: A little something extra. I found mine at Walmart, a set of 12.
- Full-Size Candy Cane: The final festive touch.
- Home Laminator Machine: for the poems, but completely optional
You can use my whimsical Snowman Soup poem printable to sprinkle more magic into your jars! Simply click the link in the previous sentence to download and print the poem.
Pro Tip
Always make sure ‘Actual Size’ is selected before printing (not fit to printable area). Or, if you want it smaller, simply reduce the image size under ‘scale’ in your printer window before printing. I took mine down to 80%.
This sweet poem not only complements the jars but also brings a smile to anyone lucky enough to receive this heartwarming gift.

DIY Snowman Soup Hot Cocoa Jar Instructions
Ready to get your holiday craft on? Follow these merry steps to assemble your adorable DIY Snowman Soup Gift Jar.
Step One: Engraving the Lid Using the xTool M1
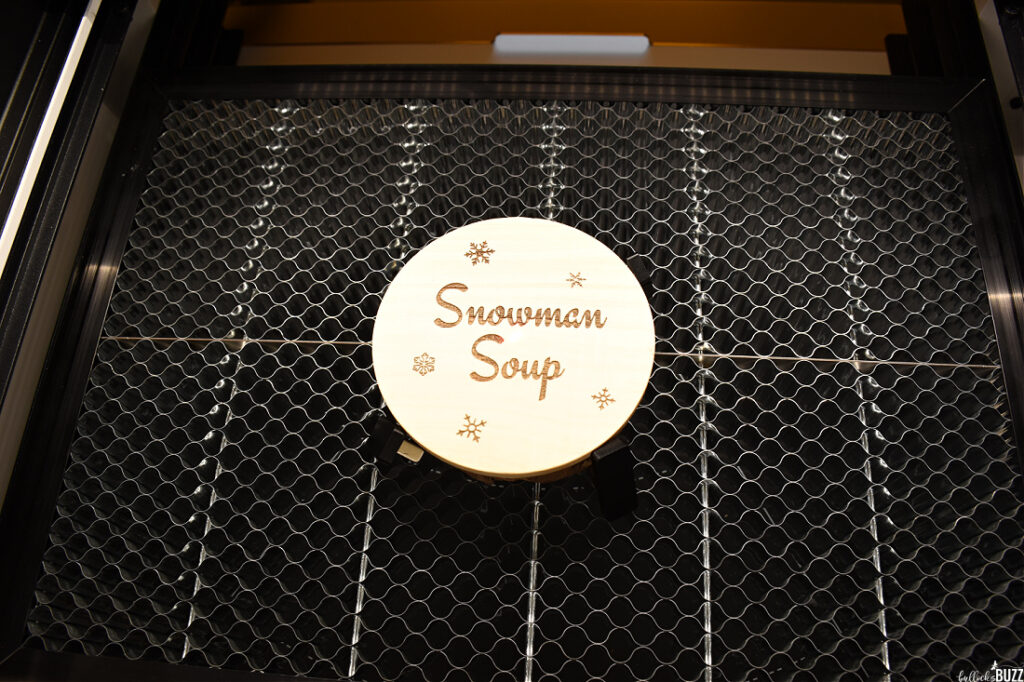
Using my Xtool M1, I etched the words “Snowman Soup” and some cute snowflakes onto the wooden lid. This personalized touch adds so much charm! If you don’t have a laser machine, below this section is another one with some alternate ideas.
Here are the steps on how to make the super cute laser-engraved lids using the xTool M1!
1. Designing in Canva
First, I went into Canva and designed a file to use with my xTool.
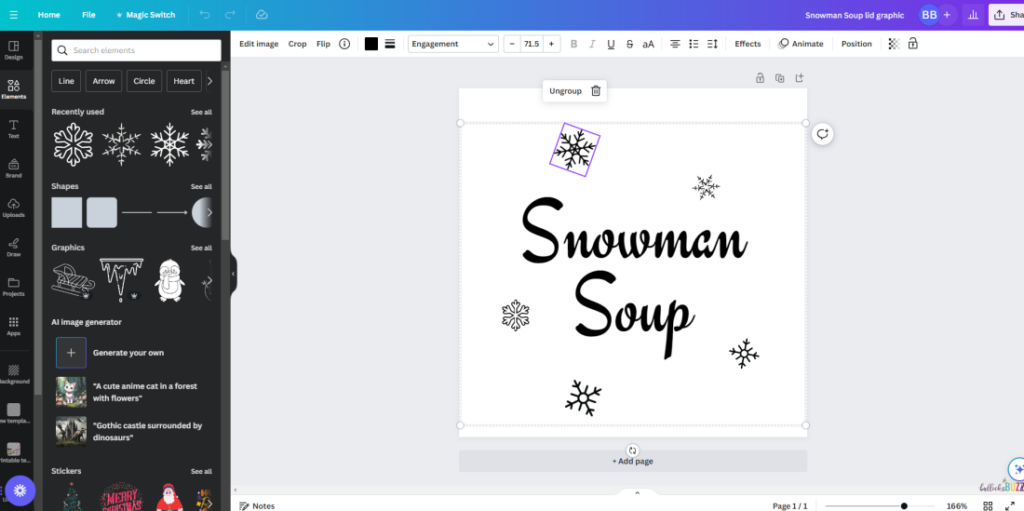
2. Setting Up in xTool Creative Space
Next, in xTool Creative Space, I imported the Snowman Soup file and then clicked on the image to open the SVG file. You can get my Snowman Soup Lid file here:

3. Engraving Process
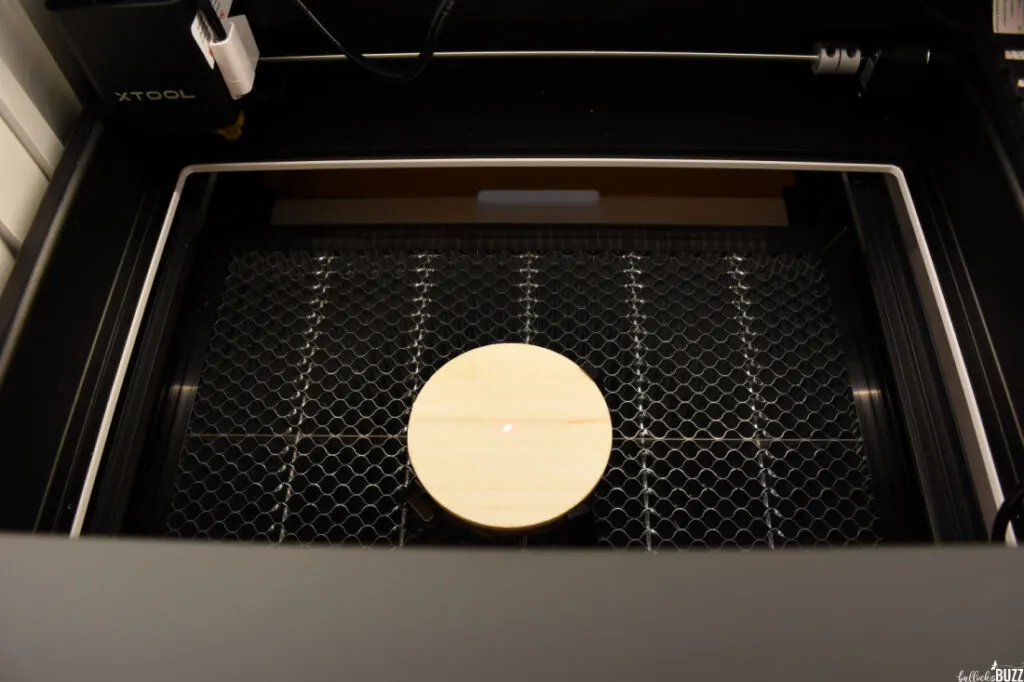
After placing the lid on the honeycomb riser inside the machine and closing the lid, I then went back to Creative Space and changed the settings to ‘engrave’.
Next, I selected User Defined Material. When I first tried to auto-measure, I got an error. So instead of manually putting in the distance, I raised the lid using a small piece of wood. This worked perfectly and the machine was able to auto-measure the distance at 31.5.
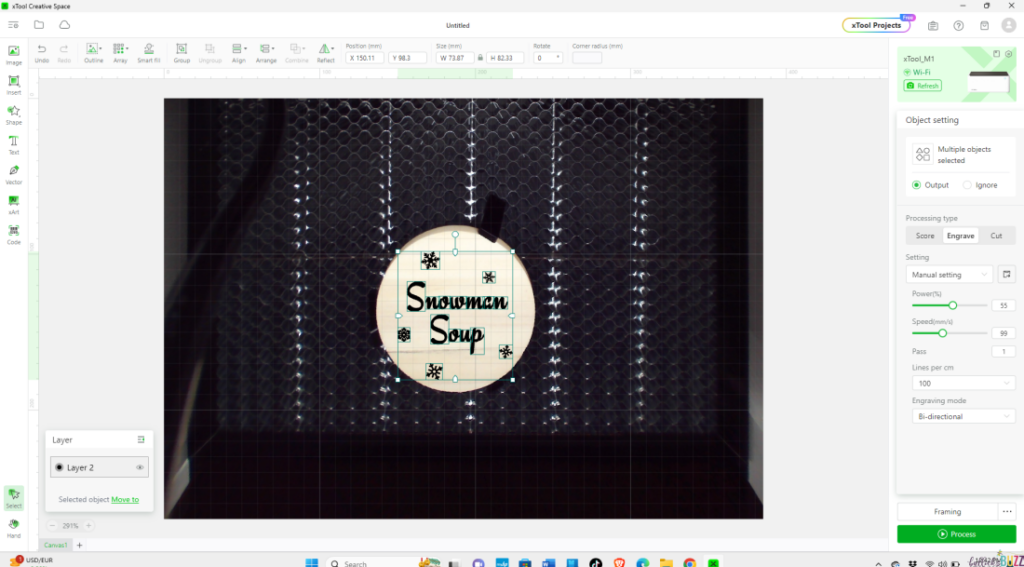

For the settings, I set the power at 55, speed at 99, and pass at 1. Then, I refreshed the camera view and used Creative Space to drag, resize, and center my image on the lid. The live camera view is one of my favorite xTool M1 features!

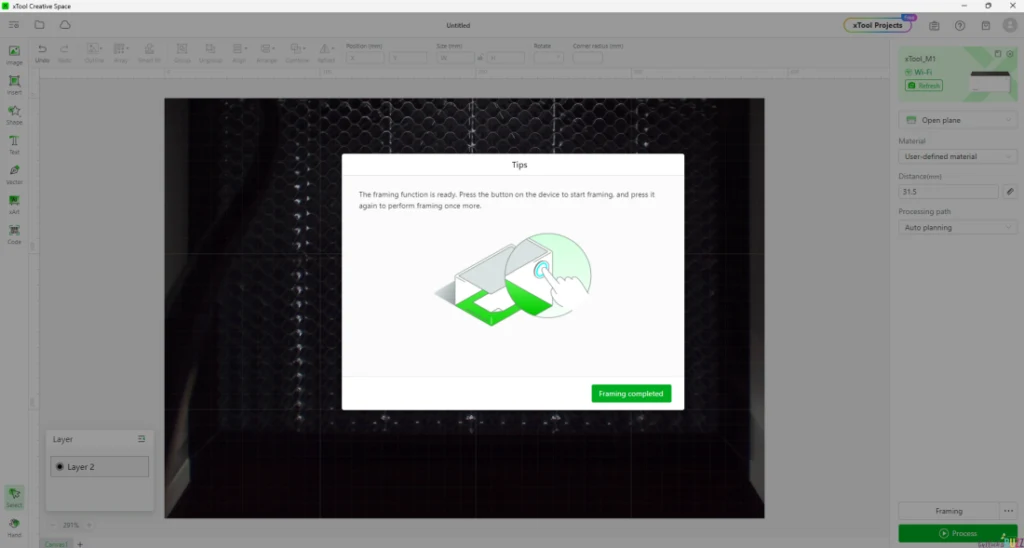
Before cutting, I had the machine frame the image. Don’t skip this as it helps ensure your design is engraved exactly where you want it (yes, I learned this the hard way).

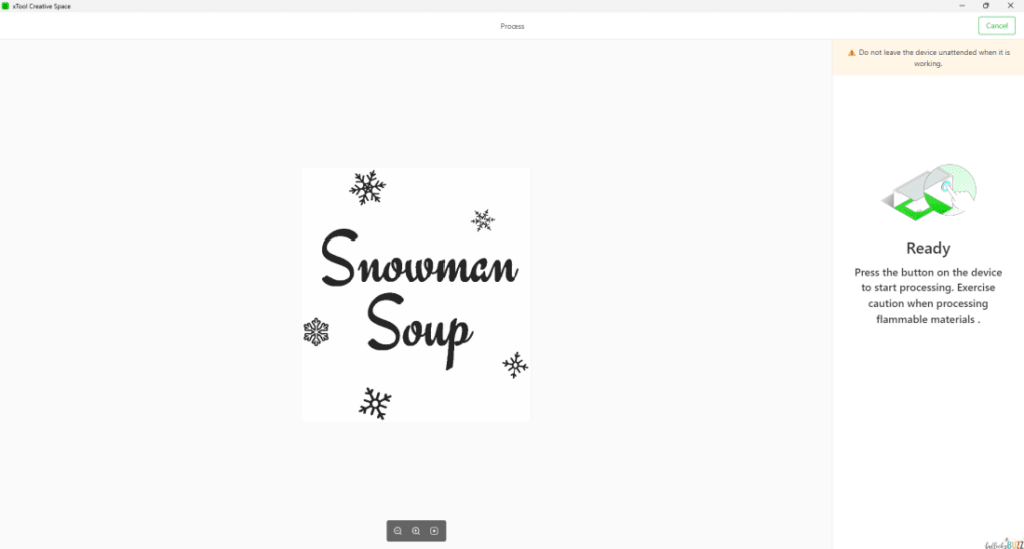
From there, I simply clicked ‘start’ in Creative Space, pushed the button on the M1, and the machine did all the rest. It was that simple! I was impressed with how quickly it engraved my lid, taking maybe 5 minutes total!

When the lid was finished, I set it aside to work on the rest of the craft.
Step Two: Layer the Ingredients
Once you have your lid ready, it’s time to add the ingredients to each jar.
- Bottom Jar: Add a mix of mini chocolate chips and crushed peppermint.
- Middle Jar: Pack it with the mini marshmallows.
- Top Jar: Fill it with the homemade cocoa mix.

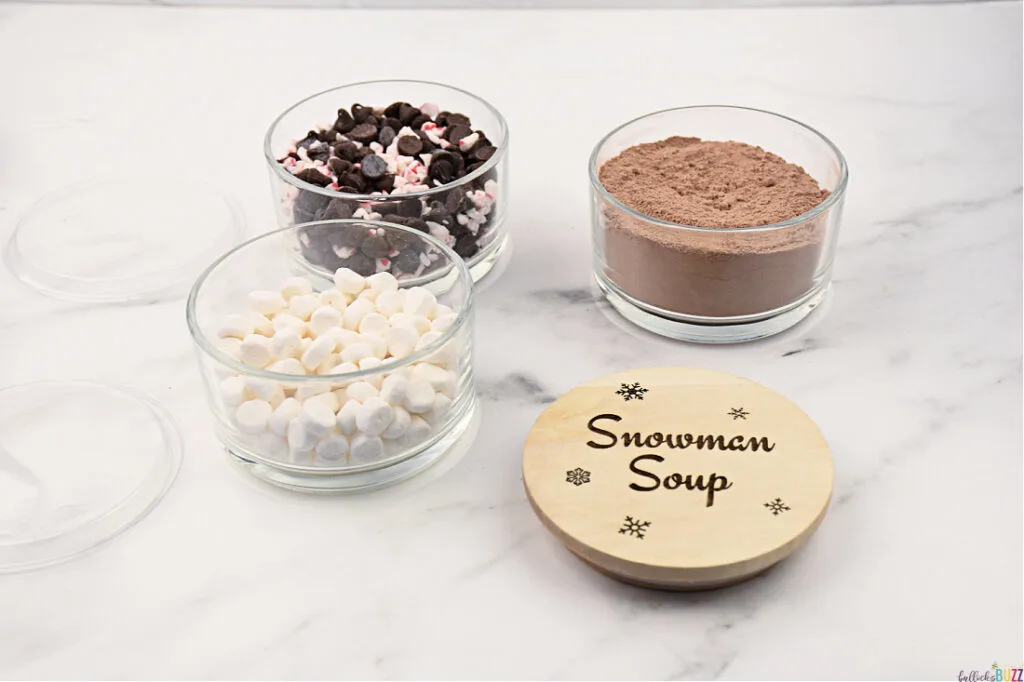
After the individual jars are filled, stack them so the hot cocoa mix is on top then seal it with your personalized lid.
Pro Tip
Use strips of clear tape running from the top of the stack of jars to the bottom in different spots to ensure they do not come apart by accident.
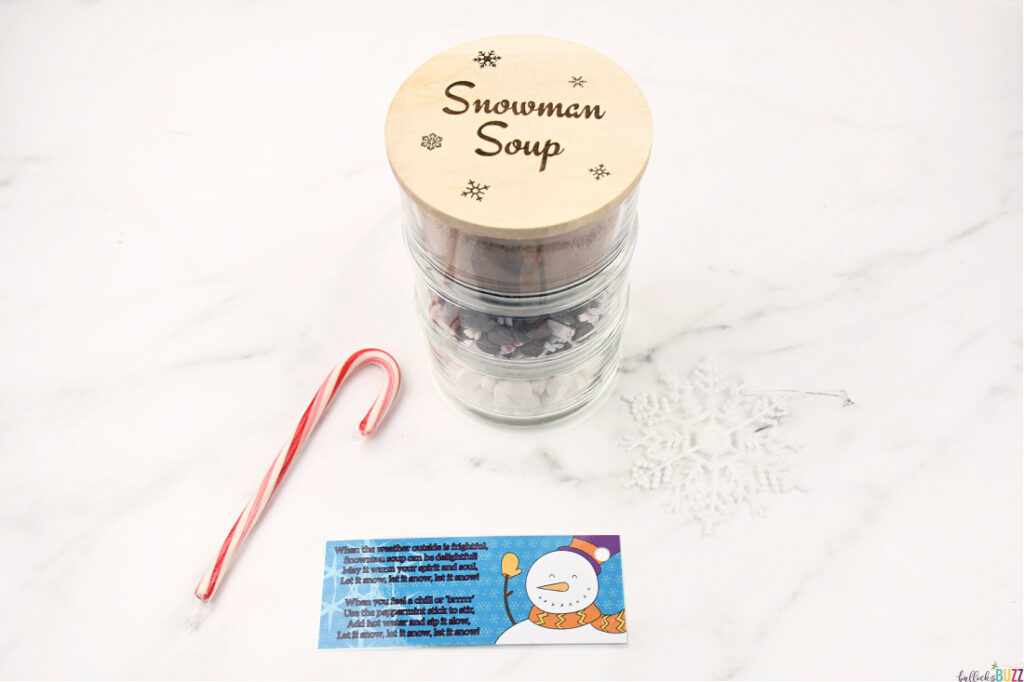

Step Three: Add the Poem and Instructions
Next, print out the Snowman Soup poem, cut off the excess paper, and fold it in half so the poem is on the front and the instructions on the back. I then laminated my poem, but you don’t have to.
Now, use a hole puncher to punch a single hole in the top left corner of the poem.
Step Five: Embellish with Holiday Cheer
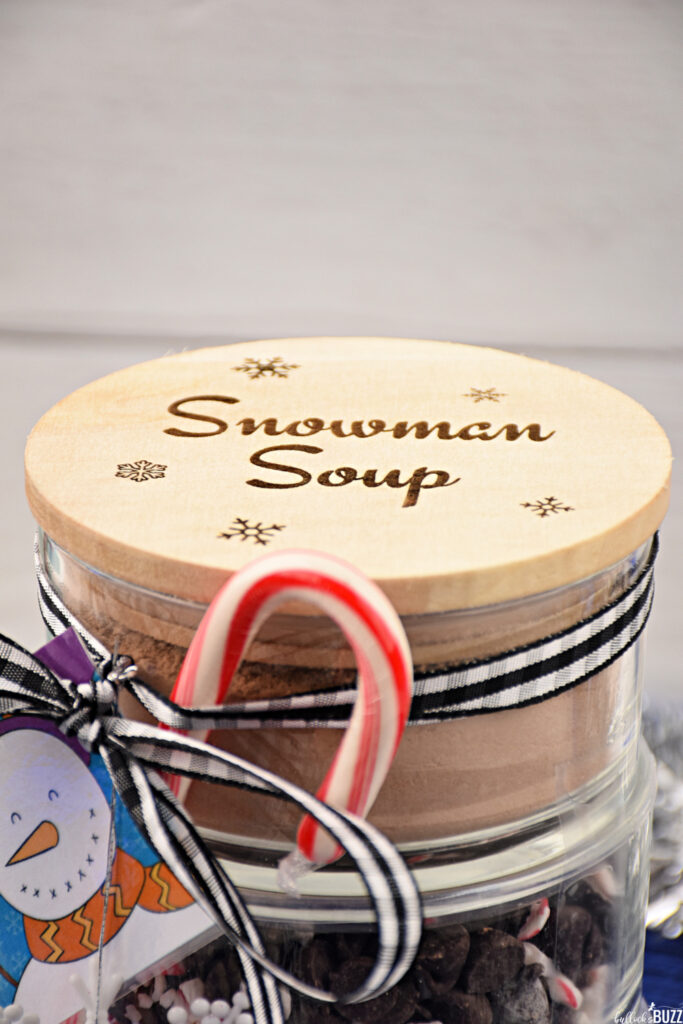
Next, take a length of ribbon and tie it around the middle part of the top jar making sure you leave enough slack so the candy cane can fit under it securely. Attach the Snowman Soup poem and the snowflake ornament before you tie a bow.
Finally, add the candy cane.
And there you have it, a trio of holiday cheer all wrapped up – your Snowman Soup Hot Cocoa Jar is ready to dazzle and warm hearts — and some bellies, too!
No Laser Engraver? No Problem!
Don’t have a laser engraver? Fear not, my festive crafters! You can still make a charming lid for your Snowman Soup Gift Jar with a few creative alternatives. Here are a few suggestions on how you can bring that holiday charm to life with just paint, markers, or a cutting machine like the Cricut or Silhouette.
Option 1: Decorate with Paint or Markers
- Freehand Magic: If you’re confident in your artistic skills, grab some paint or permanent markers and let your creativity flow! You can draw snowflakes, write “Snowman Soup”, or even sketch a cute snowman.
Option 2: Make Your Own Stencil
- Find Your Design: Search online for snowman or snowflake images that catch your eye. Websites like Pinterest are great for inspiration.
- Print and Cut: Once you’ve found your perfect design, print it out on regular paper or cardstock. Then carefully cut out the shapes to create your stencil.
- Stencil It On: Place the stencil on the lid and use markers or a sponge or brush to apply paint. For a neat finish, dab gently and avoid smearing. Let the lid dry completely before using it.
Option 3: Buy Pre-Made Stencils to Use
- Craft Store Finds: Don’t feel like making your own stencil? No worries! Head to your local craft store or browse online. You’ll find a wide array of pre-made stencils perfect for your project.
- Online Options: Websites like Amazon, Etsy, or craft retailers often have a great variety of stencils. You can find exactly what you need with just a few clicks.
- Easy to Use: Pre-made stencils are super user-friendly. Simply position them on the lid and use paint or a marker to fill in the design.
Option 4: Use a Cutting Machine for Vinyl Designs
- Cutting Precision: If you have access to a cutting machine like a Cricut or Silhouette, it’s a fantastic way to create intricate designs for your jar lids using vinyl. The xTool M1 is also a cutting machine!
- Design Process: Start by selecting or creating your design in the cutting machine’s software.
- Vinyl Application: Once your design is cut, carefully apply the vinyl to the lid.
- Seal for Durability: After applying the vinyl, you might consider sealing it with a clear spray to ensure it stays put and adds a professional finish to your DIY Snowman Soup Hot Cocoa Jar lid.
With these creative alternatives, your Snowman Soup Gift Jar will still have that beautiful handmade charm and personal touch, even without a laser engraver!

Variations to Spice Up Your Snowman Soup Gift Jar
One of the joys of DIY crafts is the freedom to customize and get creative! Here are some fun variations you can try with your Snowman Soup Gift Jar to make each one uniquely yours.
1. Mix and Match Jar Contents:
- Spice It Up: Add a cinnamon stick or a dash of nutmeg to the cocoa mix for a unique twist.
- Colorful Marshmallows: Use marshmallows in different shapes and colors to add a playful touch.
- Flavored Chips: Instead of regular chocolate chips, try using white chocolate or mint-flavored chips for a different taste experience.
2. Customize the Lid:
- Laser Options: Create unique custom designs related to snowmen and winter. Laser engrave snowflake patterns, winter scenes, or phrases like “Let It Snow” to add a personal touch to your jars.
- Stencil Variety: Mix it up by combining different stencil designs to create a unique look. Layering different patterns can give your jar lid an extra special touch.
- Add Cute Extras: add little details like glitter or tiny stickers for that extra sparkle.
- Mix and Match: Combine freehand drawing and stenciling for a unique look. For example, stencil a few snowflakes and then add a few hand-drawn details.
3. Ribbon and Embellishments:
- Themed Ribbons: Choose fun and festive ribbons that match your specific holiday theme or color scheme.
- Charms and Ornaments: Try adding small holiday charms or other miniature ornaments besides a snowflake to the ribbon for an extra festive look. A little snowman ornament would be adorable!
5. Packaging Personalization:
- Gift Box: Place the jar in a pretty gift box filled with festive tissue paper.
- Reusable Bags: Or consider packaging the jar in a reusable holiday-themed bag.
These variations not only add a personal flair to each Snowman Soup Gift Jar but also make the crafting process even more enjoyable. Don’t be afraid to experiment and put your own unique spin on this delightful holiday project!
More Holiday Crafts and Treats
If you’re overflowing with holiday crafting enthusiasm, check out my other festive DIY ideas. They’re sure to add an extra dash of cheer to your holiday celebrations!

Like It? Love it? Please Share It!
I hope you love this DIY Snowman Soup Hot Coca Jar craft as much as I do! It was so fun and easy to make! If you decide to make this DIY holiday gift idea, I’d love to see how it turned out!
I can’t wait to see your version of the DIY Snowman Soup Hot Cocoa Jar with Engraved Lid! Share your creations on Instagram, Facebook, or Twitter, and tag me @bullocksbuzz or @alainabullock. Don’t forget to use #BullocksBuzz so I can celebrate your crafting success with you!
And if you enjoyed this post, please leave a ⭐⭐⭐⭐⭐ rating below and share your thoughts in the comments. Your feedback is the sprinkle of joy on my festive day!
Happy crafting and may your holidays be merry and bright! 🎄✨🎅