This post contains affiliate links. I only recommend products I use and love. Read the full disclosure here
Last Updated on December 26, 2023 by Alaina
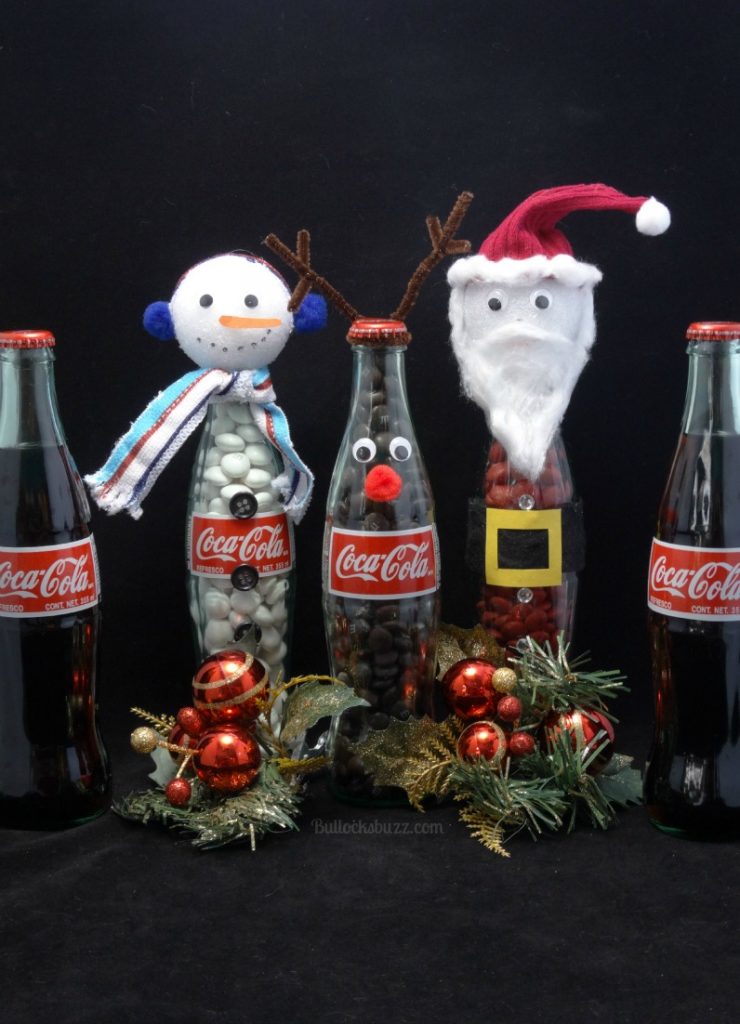
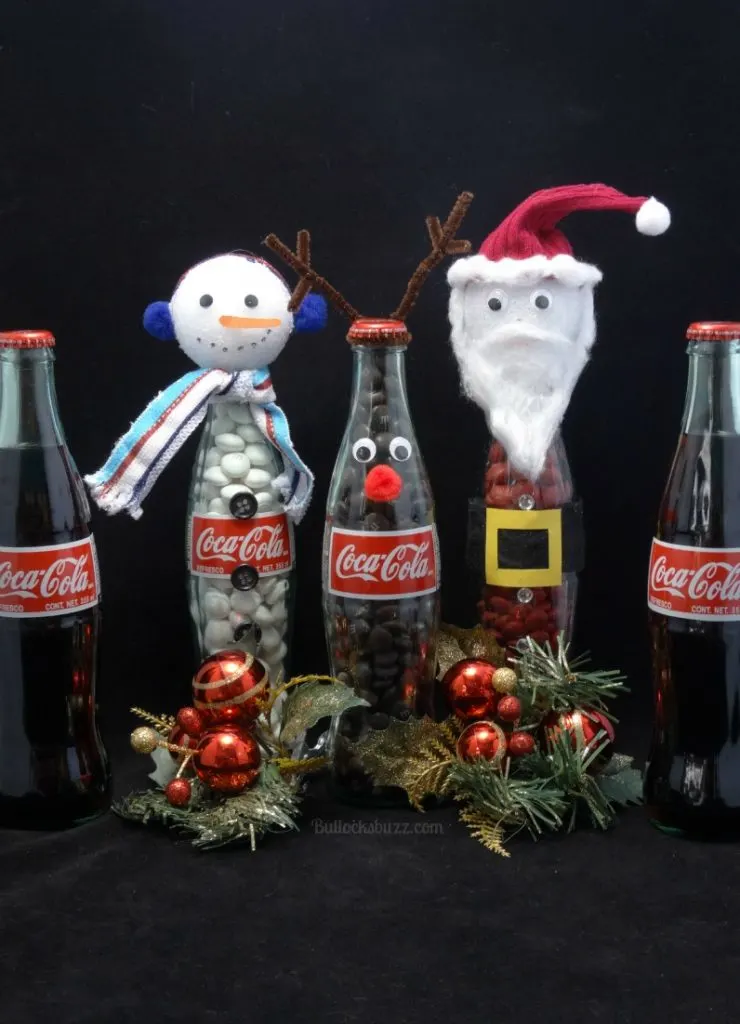
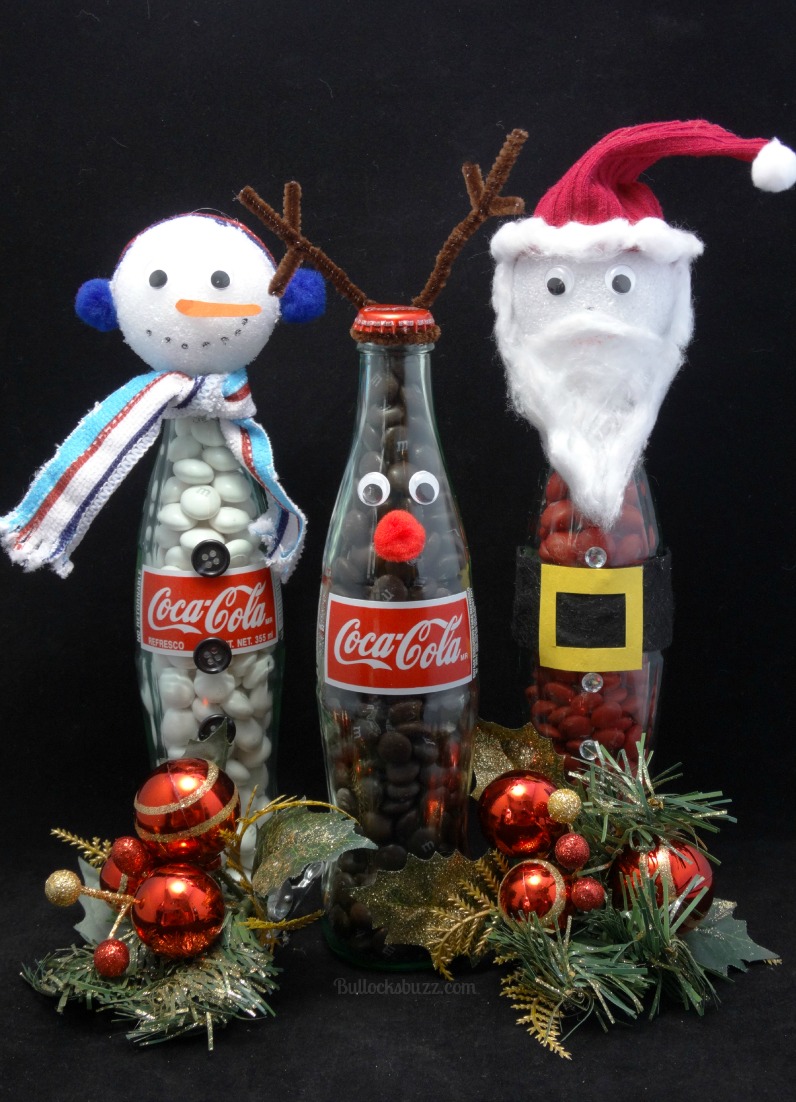
Make your holidays sparkle with these irresistible candy-filled DIY Coke Bottle Christmas Characters! Perfect for gifting or treating yourself, this craft transforms empty Coca-Cola bottles into delightful holiday treasures.

After making my Christmas Coca-Cola Cupcakes the other day, I had several empty Coke glass bottles that I hesitated to throw away. I’m all for making upcycled crafts, and I just knew there was something I could make with these.
After thinking for a few minutes, I remembered how much you all liked my DIY Halloween Candy Ornaments and my DIY Halloween Candy Jars, and that’s when inspiration hit: Candy-Filled Coke Bottle Christmas Characters!
These DIY Coke Bottle Christmas Characters are so cute! They can be used as Christmas decor or you can give them as a gift! They could be left as is or be used as a sweet treat to eat!
How to Make DIY Coke Bottle Christmas Characters
This super simple upcycled Christmas craft is so much fun to make. It calls for very few supplies and doesn’t take long at all.
Each of these DIY Coke Bottle Christmas Characters is made pretty much the same way. The only thing that differs is the colors, facial features, and extras. All of them will look great on your table or in the window, and they also make a wonderfully unique gift!
Disclosure: This blog post contains affiliate links for products I think you’ll love. If you make a purchase from one of these links, Bullock’s Buzz will make a small commission at no additional cost to you. As always, I only recommend products that I have (or have had), use, and love.

DIY Coke Bottle Christmas Characters Supplies
Ready to bring these charming Coke Bottle Christmas Characters to life? Below, you’ll find a comprehensive list of all the supplies needed to create all three delightful characters. Following the main list, are the supplies specific to each character along with the the instructions.
- empty, clean Coke bottles, glass
- M&Ms – red, brown and white
- 2 small styrofoam balls (sorry I do not remember the size, I want to say 2-inch?)
- small pom poms – white, red, and blue
- Cotton balls
- Black felt
- Yellow construction paper
- Orange construction paper
- Wiggly eyes
- Red and black markers
- Red fabric (I used an old red sock)
- Silver rhinestones
- Brown chenille stems
- Patterned fabric for the scarf and earmuffs (I used a dollar store towel)
- black buttons
DIY Coke Bottle Characters – Santa
This Santa DIY Coke Bottle Character is the perfect Christmas decor and treat!
Santa Supplies
- red M&MS
- 1 small styrofoam ball
- 1 small, white pom-pom
- Cotton balls
- Black felt
- Yellow construction paper
- Wiggly eyes
- Red or rose-colored marker
- Red fabric (I used an old red sock)
- Decorative self-adhesive rhinestones
Instructions to Make DIY Santa Coke Bottle Christmas Characters Craft
Step One: Prep the Coke Bottle
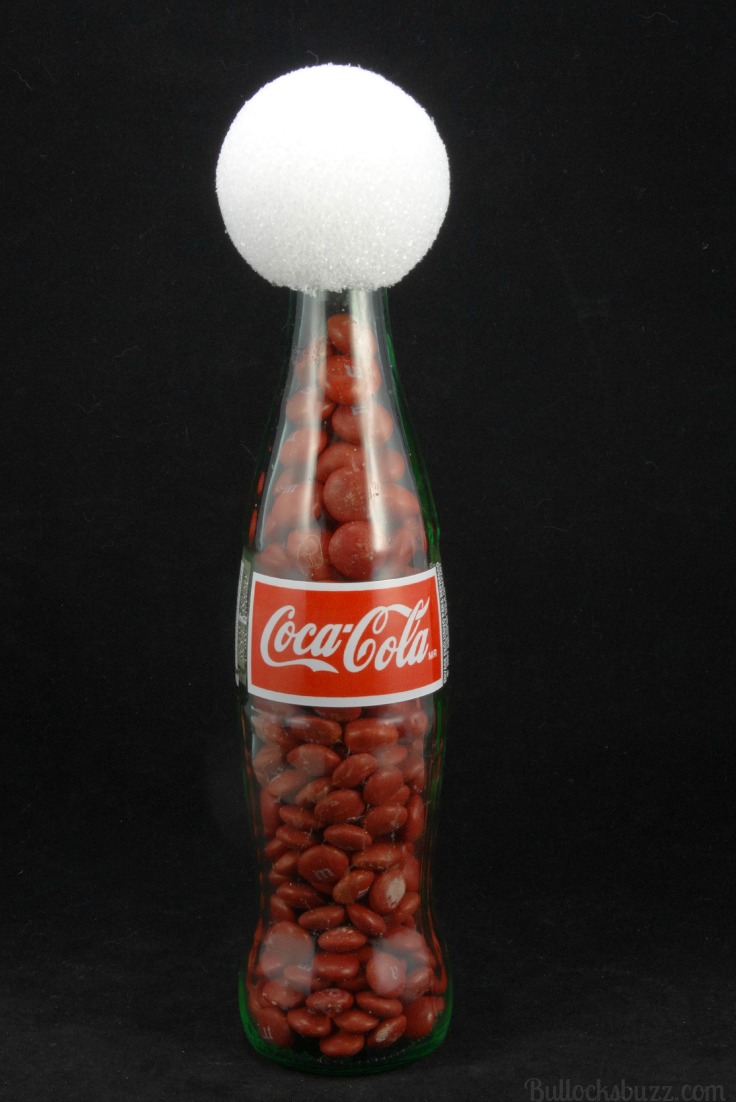
- Begin by cleaning the empty bottle and allowing it to dry completely.
- Next, fill it to the top with red colored candies. I used M&Ms.
Step Two: Make the Head
- Use a knife to carefully dig out a hole in a styrofoam ball big enough to fit over the top of the bottle. I actually started a small hole and was then able to get mine on by pushing down and twisting at the same time. This part can be messy, so you may want to do it over some newspaper.

Step Two: Make the Hat
- Cut off the top part of the sock (about 3″ worth), then fold the ‘collar’ of the sock over a tiny amount and fit it over the head, securing it with hot glue.
- Use hot glue to form the hat into the shape you want.
- Next, hot glue a white pom-pom to the tip, and fold the hat over to one side.
- Use cotton to form the rim of the hat
- TIP – you can always make one out of construction paper

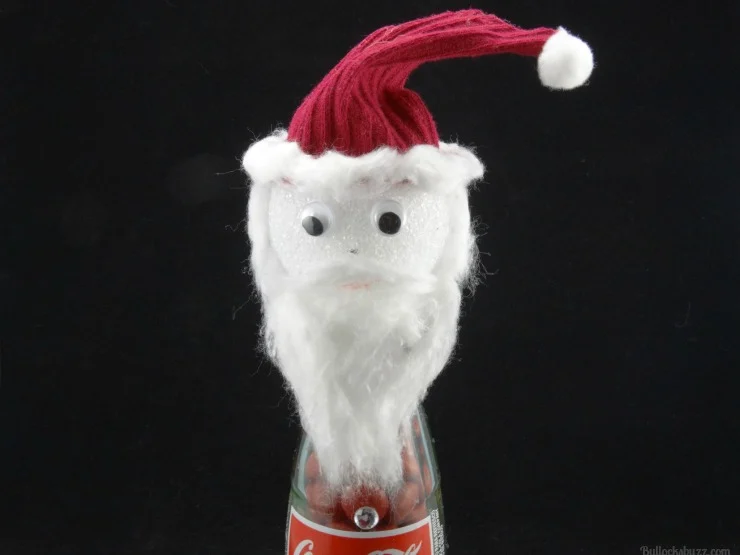
Step Three: Add the Hair and Facial Hair
- Tear apart cotton balls to be used as hair and facial hair.
- Use hot glue to add the hair, mustache, and beard.
Step Four: Add Facial Features
- use hot glue to add the eyes.
- draw a mouth using a red marker.
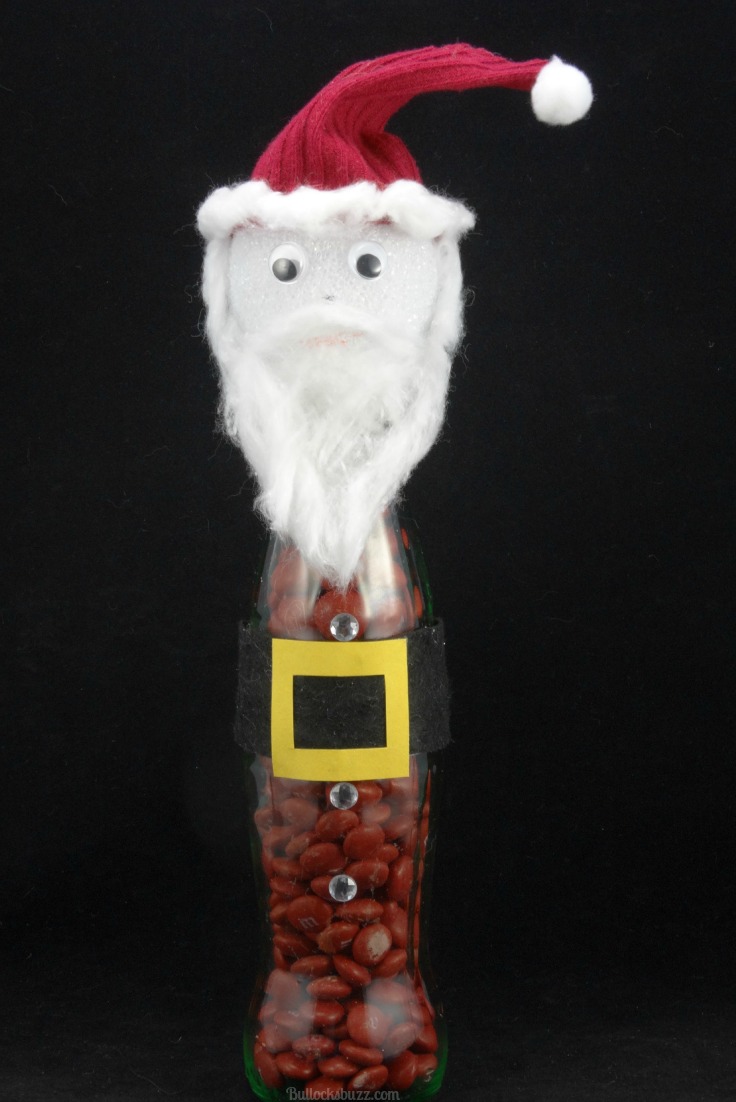

Step Five: Make the Belt
- Cut a strip of black felt about 2″ wide, and glue it around the middle of the bottle with hot glue
- Add a buckle made of yellow construction paper.
- Add a few self-adhesive rhinestones for buttons down the bottle’s front.
And there’s Santa! Don’t you just love him?
DIY Coke Bottle Characters – Reindeer
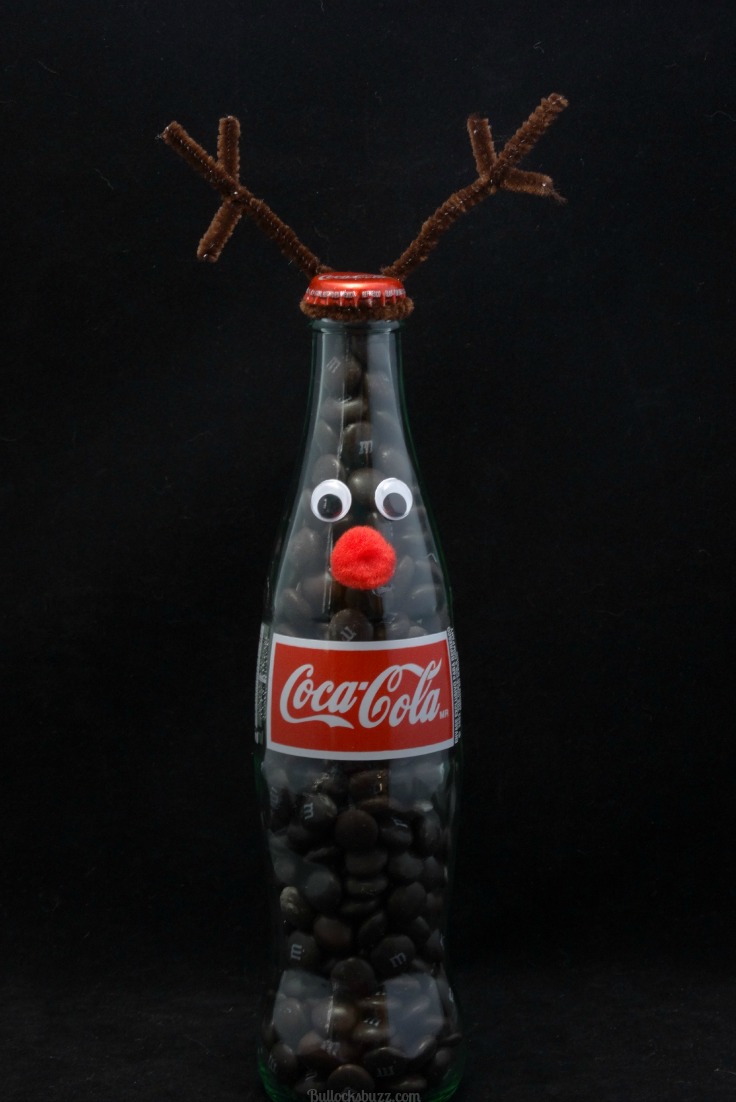
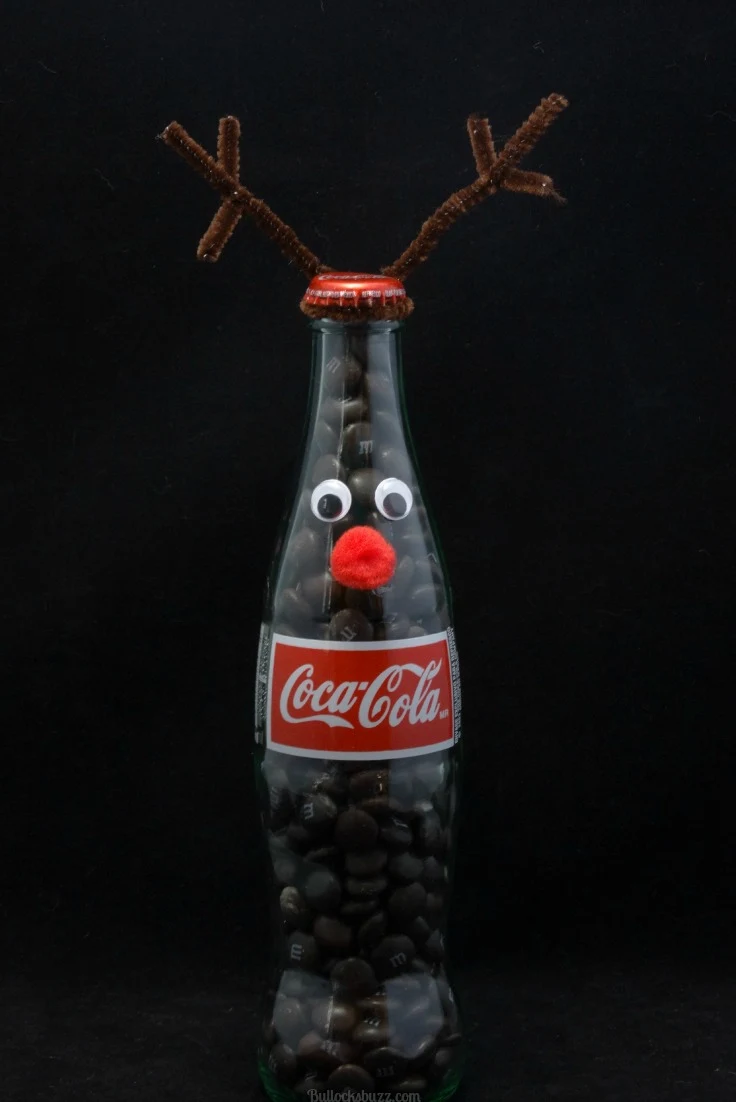
This Reindeer DIY Coke Bottle Character will light up their eyes with joy!
Reindeer Supplies
- 1 empty, clean Coca-Cola bottle
- Brown M&Ms
- 2 Brown chenille stems
- 2 Wiggly Eyes
- 1 Small red pom-pom
Instructions to Make DIY Reindeer Coke Bottle Christmas Characters Craft
Step One: Prep the Coke Bottle
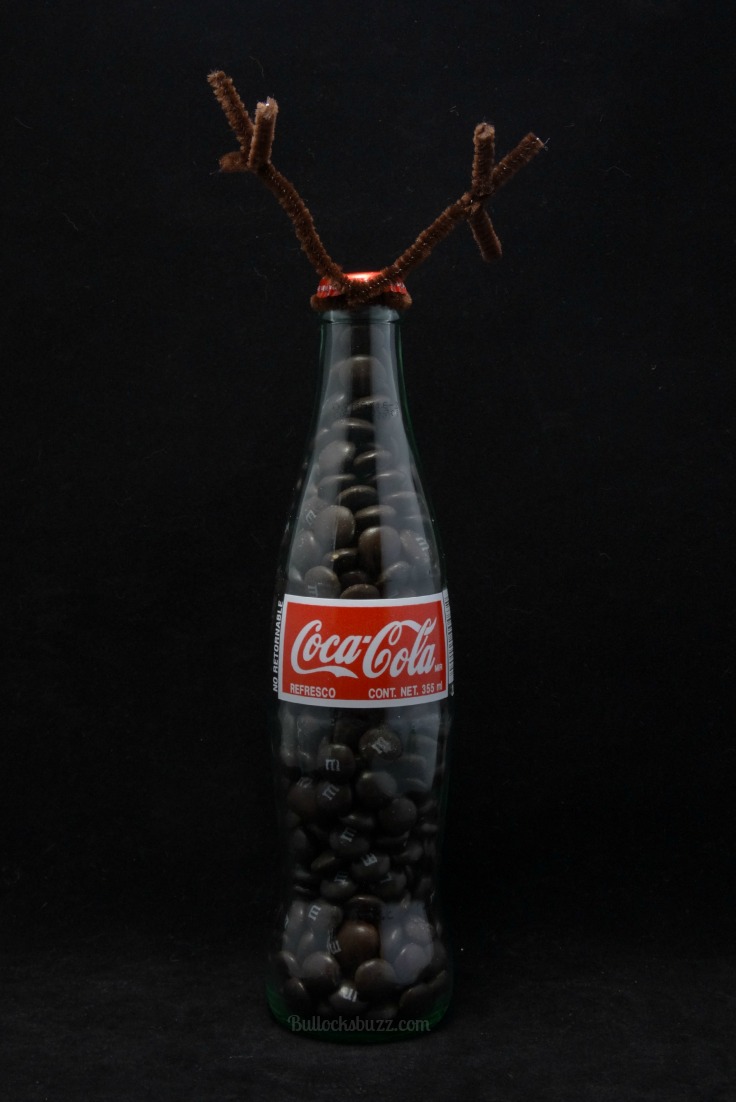
- Start by cleaning the empty bottle and allowing it to dry completely.
- Next, fill it to the top with brown-colored M&Ms.
Step Two: Make the Antlers
- Cut one of the chenille stems into two 2-inch pieces.
- Twist one of the short pieces one time around one end of the uncut chenille stem and then do the same with the second small piece on the other end.
- Starting from the middle of the uncut chenille stem, wrap it around the neck of the bottle, twisting it together once or twice in the back so it is secure.
- Lastly, bend the shorter pieces on each end up and out to resemble antlers.

Step Three: Add Facial Features
- Using hot glue, add the wiggly eyes to the top part of the bottle.
- Then add the red pom pom nose under the eyes.
And your reindeer bottle is finished! So cute!
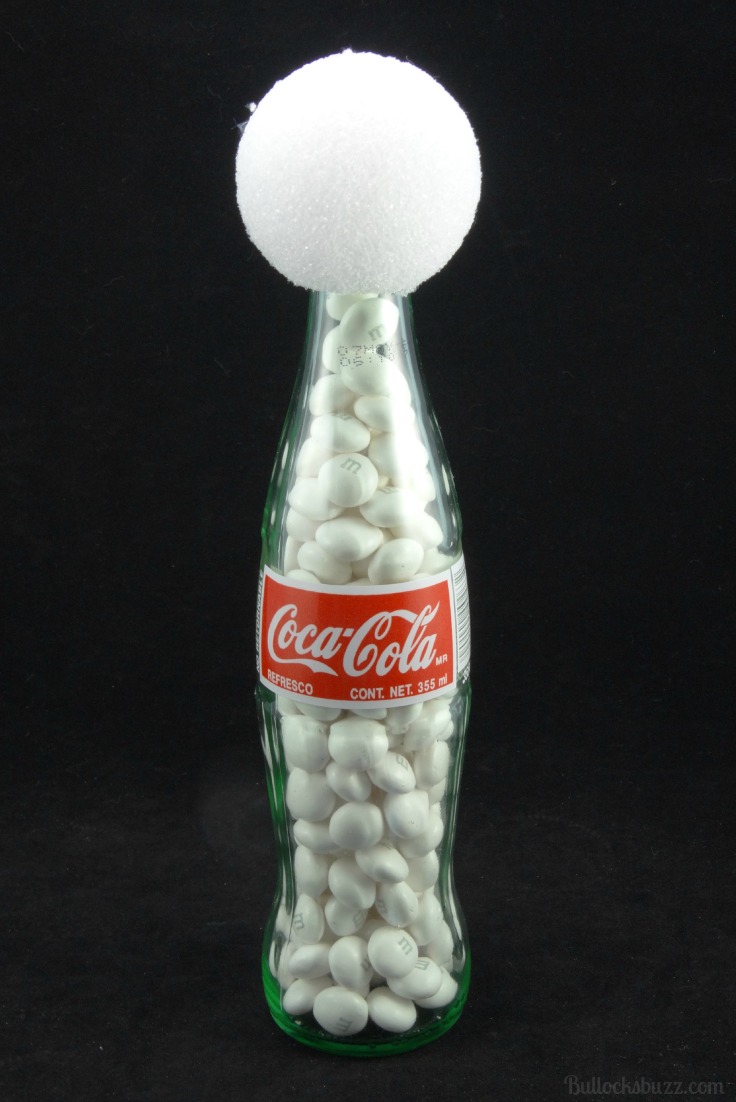
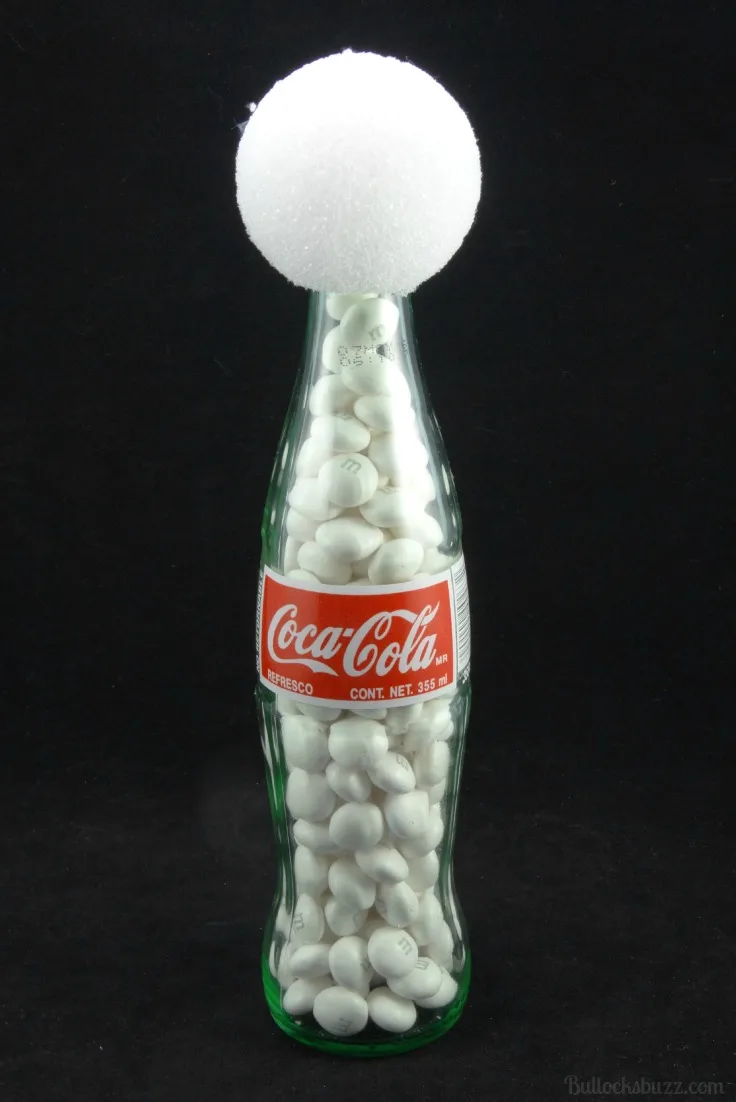
DIY Coke Bottle Characters Snowman
This Snowman DIY Coke Bottle Character is as cool as he is cute!
Snowman Supplies
- 1 Empty, clean Coca-Cola bottle
- White M&Ms
- 1 Small styrofoam ball
- Patterned fabric for the scarf and earmuffs (I used a dollar store towel)
- 2 Pom-poms (your choice of color) for earmuffs
- 2 Wiggly eyes
- Black marker
- Orange construction paper for the carrot nose
- 3 black buttons
Instructions to Make DIY Snowman Coke Bottle Christmas Characters Craft
Step One: Prepare the Coke Bottle
- Thoroughly clean the bottle and allow it to dry completely.
- Next, fill it to the top with white M&Ms.
Step Two: Attach the Head
- Just like we did with the Santa bottle, attach the styrofoam ball to the top of the empty bottle for the snowman’s head.
Step Three: Make Earmuffs and Scarf
- Measure and cut a tiny strip of fabric for the earmuffs. It needs to be long enough to fit across the top part of the “head” down to where “ears’ would be. Make sure you don’t cut it too wide, either.
- Measure and cut another piece for the scarf, making sure it is long enough to tie around the neck of the bottle, and still hang down some.

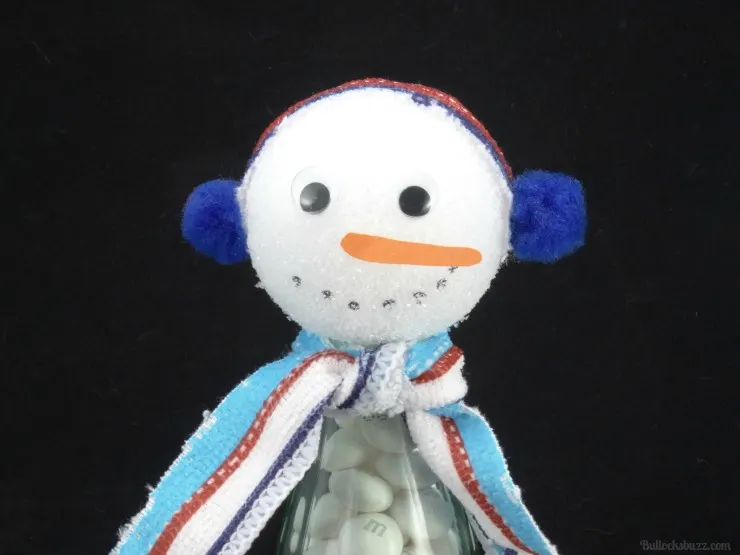
Step Four: Attach the Earmuffs
- Using hot glue, attach the small piece of fabric across the top of the head (from ear to ear), and then hot glue one tiny pom-pom on either end to make the fuzzy parts that go over the ears.
Step Five: Attach the Scarf
- Tie the scarf around the neck and knot it as though you were doing the first step of tying your shoes.
- Secure it with a dab of hot glue, allowing the two ends to hang down.
Step Six: Make and Attach Facial Features
- Use hot glue to attach two eyes.
- Make a carrot-shaped nose from orange construction paper and then add it to the snowman’s face with hot glue.
- Use a black marker to draw the mouth.
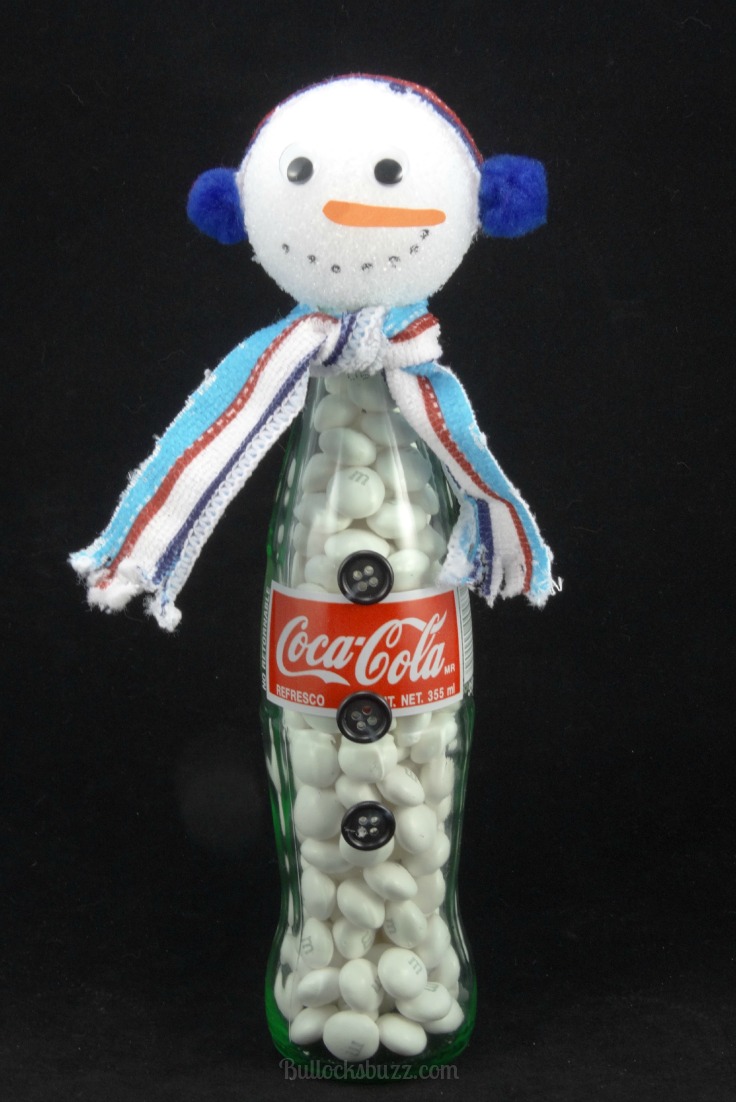

Step Seven: Add 3 Buttons
- Hot glue three black buttons down the front of the bottle.
And now you have a snowman! Isn’t he adorable?

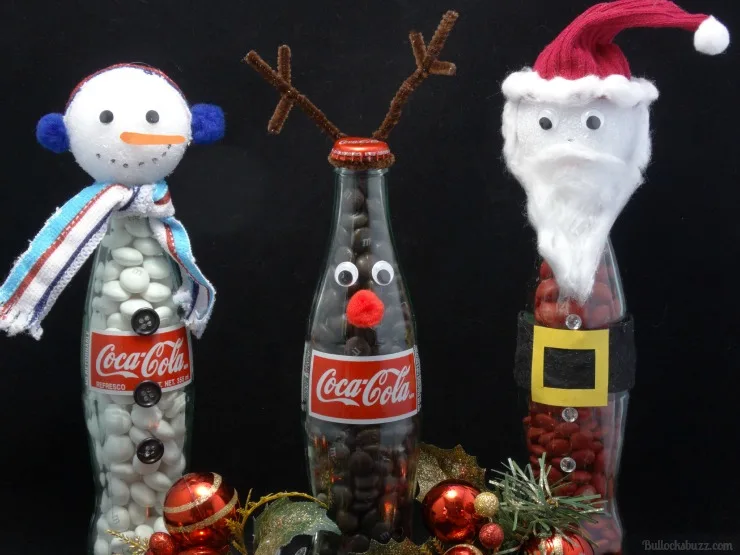
And there you have it! Three cute, candy-filled, upcycled DIY Coke Bottle Christmas Characters that are perfect to use as holiday decor, or to give as a fun and sweet holiday gift!
Other DIY Holiday Crafts
Looking for more quick and easy Christmas crafts? I think you will love these!
- Christmas Cloche
- Snowman Soup Jar with Engraved Lid
- DIY Christmas Ornaments – Crinkle Paper Character Ornaments
- Two DIY Grinch Christmas Ornaments – Easy Grinch Christmas Craft
- DIY Christmas Napkin Rings


Like It? Love It? Please Share It!
I hope you love this Grinch Christmas Craft tutorial! It’s simple and so much fun to make! If you do decide to give it a try, let me know! Nothing makes me happier than seeing your take on my crafts and recipes!
Tag me at @bullocksbuzz on Instagram and Facebook or @alainabullock (on Twitter). And be sure to use #BullocksBuzz so I can see your creation and share it!
Also, please share it with friends and family by using the social share buttons right below the post title!