
This post may contain affiliate links. I only recommend products I use and love. Read the full disclosure here
Updated on: August 29, 2024
Originally published on: September 26, 2023
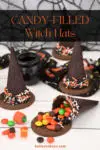
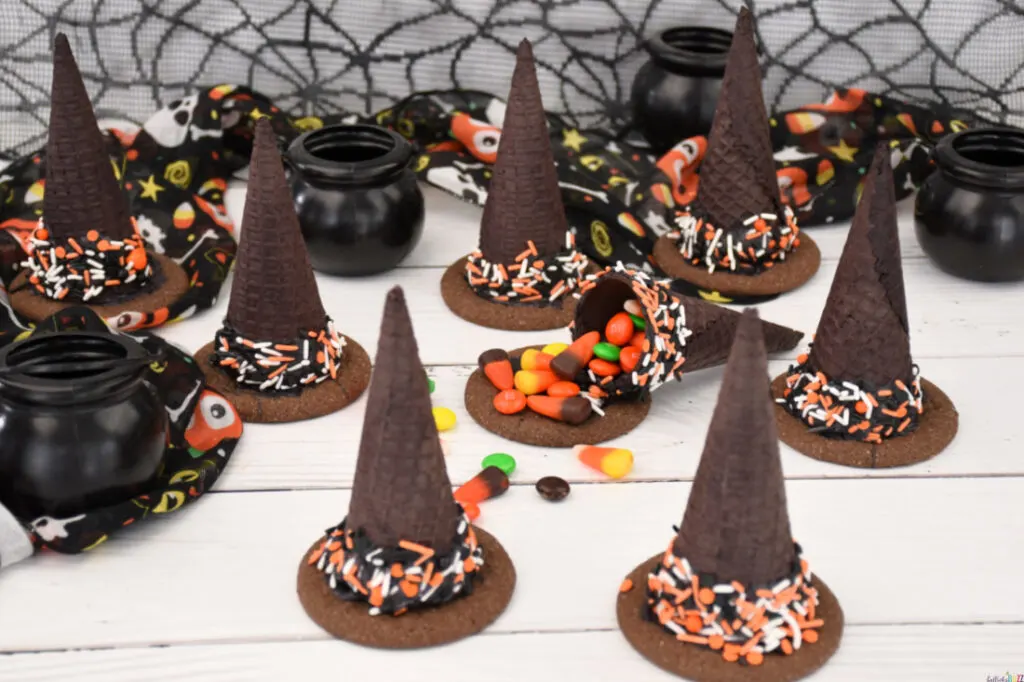
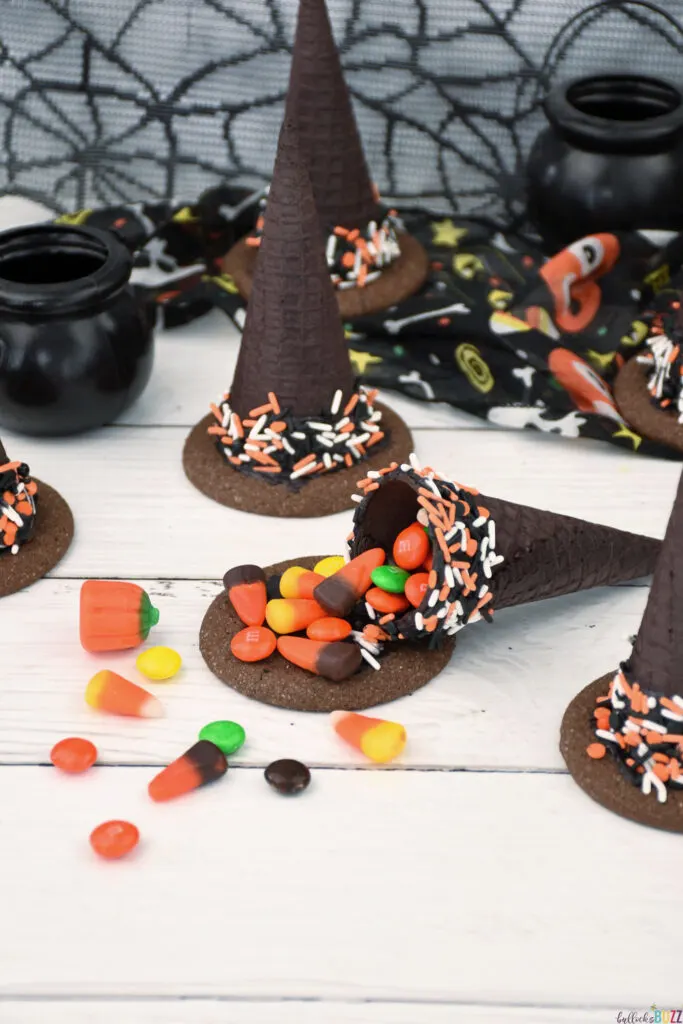
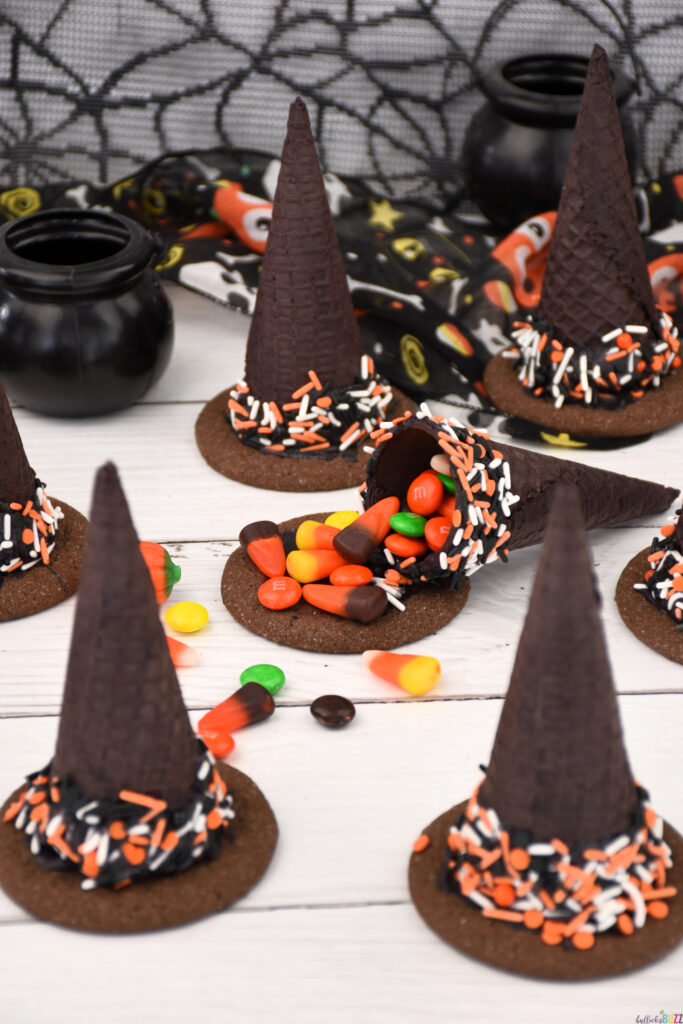
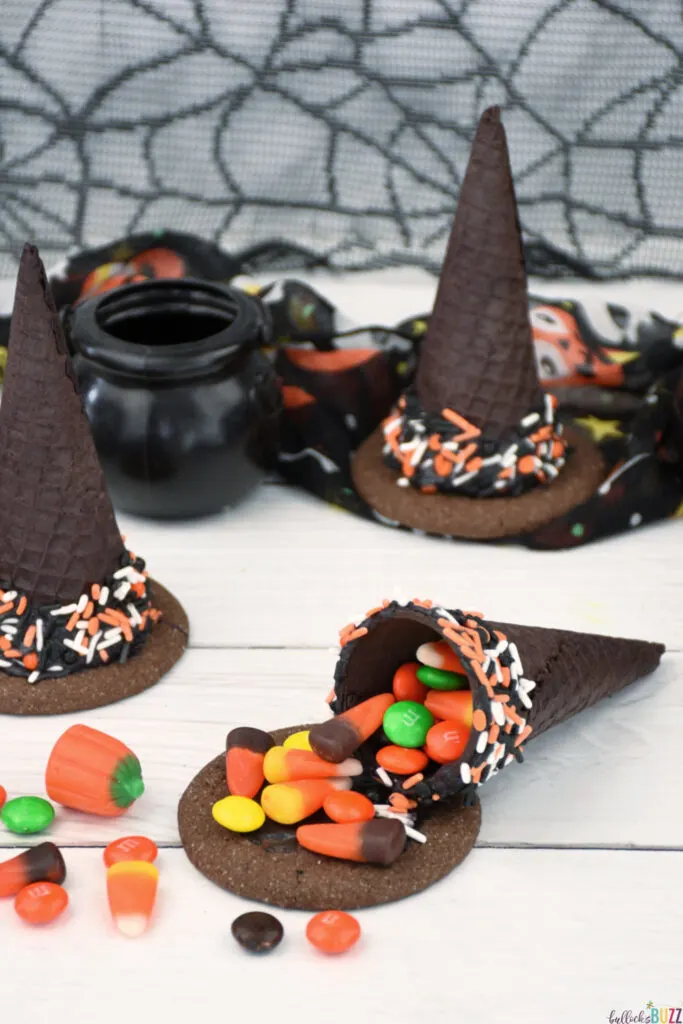
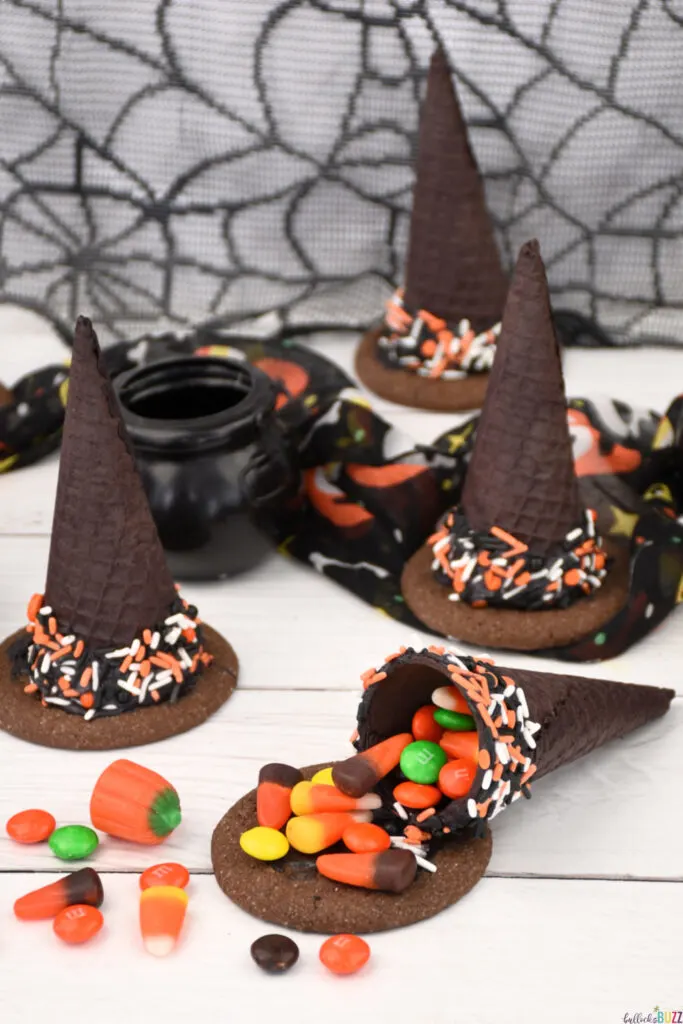
Candy-Filled Witch Hats are a wickedly delightful no-bake Halloween treat crafted with ice cream cones, cookies, melted chocolate, sprinkles, and candy. Little witches and warlocks will adore crafting and eating these bewitching treats!


Welcome back my little ghouls and goblins! With the season of spooks and sweets right around the corner, I’ve got another devilishly delightful Halloween recipe to share with you: Candy-Filled Witch Hats! These spellbinding ice cream cone witch hats filled with Halloween candies will help you make this Halloween the most bewitching one yet!
Halloween offers the perfect opportunity to indulge in some wickedly good treats! And I’ve got so many frightfully delicious Halloween recipes for you including my Bat Brownies, Poison Potion Punch, and even swirled Halloween Candy Bark – simply right-click the link and open these spooktacular sweets in a new tab so that you can check them out after this one!
One of my favorite things about these witch-themed Halloween treats is that they are so quick and easy to make because there is no baking involved! Just follow my five-step spell, I mean recipe, and you’ll be done in a matter of minutes!
So gather your cauldron and broomstick, and let’s get ready to conjure up a bit of kitchen magic with these eerily easy ice cream cone witch hats filled with candy.

Pin for Later
Too busy to make this tasty recipe right away? Why not Pin it for later? Pin this easy recipe to your favorite board on Pinterest and it will be there waiting for you when you are ready!
ICE CREAM CONE WITCH HATS
Trick or treat! What better way to celebrate the spookiest time of the year than by conjuring up your very own Candy-Filled Witch Hats?
These spooky Witch Hat cookies are the perfect treat for any Halloween celebration whether you’re hosting a spooky soirée or enchanting trick-or-treaters.
Plus, they are so easy to make they’d be a fantastic Halloween activity for little ghouls and goblins!
And speaking of kids, these cute witch hats will have them screaming with delight! Not only because these fun treats really look like witch hats, but also because they have a surprise inside. What kid wouldn’t like that?!
They remind me of a piñata cake or piñata cookies where the delicious treats are hidden inside!

HOW TO MAKE CANDY-FILLED WITCH HATS FOR HALLOWEEN
Below you’ll find a step-by-step guide straight from my spell book on how to make Candy-Filled Witch Hats. From crafting the hat to filling it with candy, you’ll find all the guidance you need to create these spine-tingling treats.
You will find the full list of ingredients, including measurements, and step-by-step instructions in the free printable recipe card at the bottom of this post.
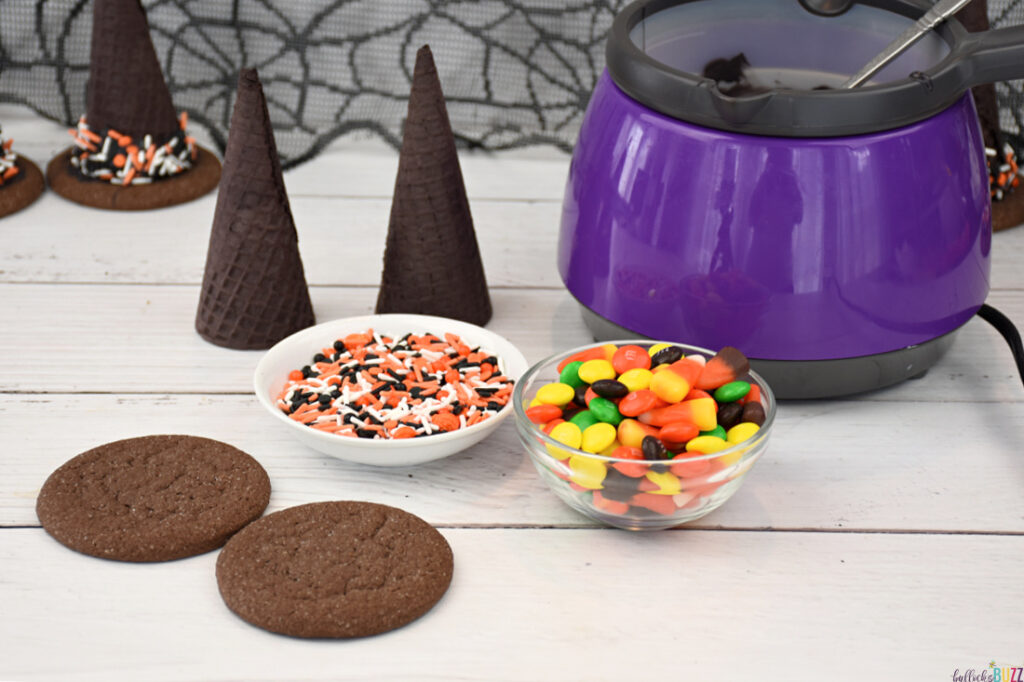
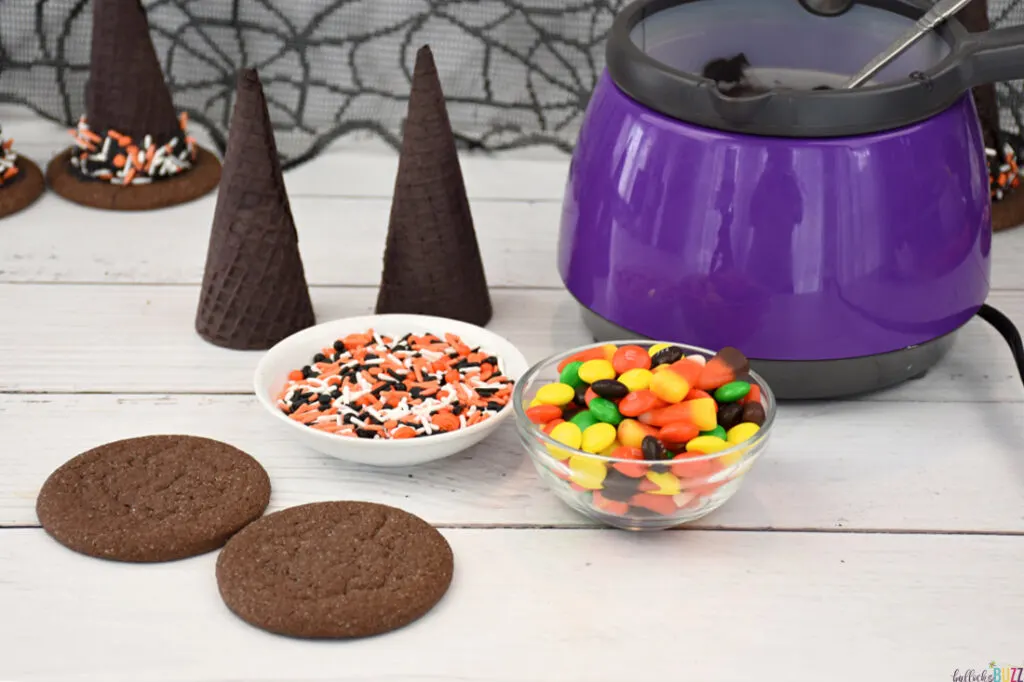
KITCHEN TOOLS YOU WILL NEED
To make these easy no-bake Halloween treats, you will need a sprinkle of creativity, a dash of Halloween magic, and the following kitchen tools.
Disclosure: This blog post contains links to products or services I think you will like. If you purchase from one of the links, I may make a small commission at no extra cost to you. As always, I only recommend products that I use and love.
- candy melting pot, microwave, or double boiler to melt the candy melts
- spoon, offset spatula, or food-safe paintbrush

INGREDIENTS YOU WILL NEED TO MAKE ICE CREAM CONE WITCH HATS
No eye-of-newt is needed for these little beauties, but before we cast our spell to create these Candy-Filled Witch Hats, you will need to gather some mystical ingredients.
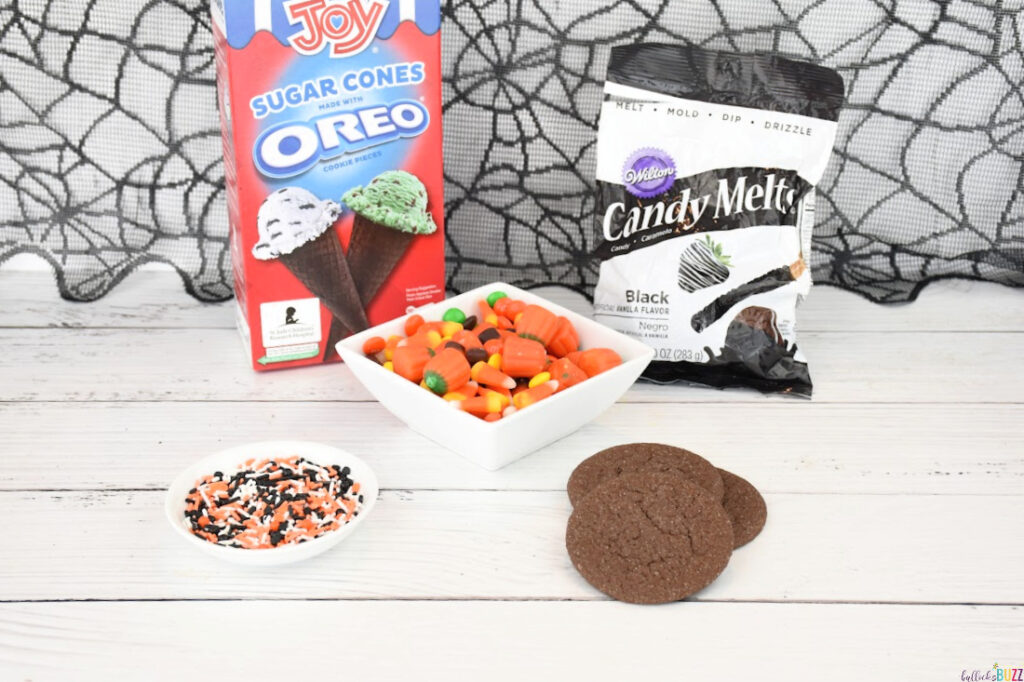
- Oreo Ice Cream Cones – the top of our witch hats. Joy is the brand I found, but if you cannot find them at your store, use Wilton Black Color Mist to color plain sugar cones black!
- Fudge cookies (dark brown) – the base for the Halloween witch hats, make sure they are wider than the base of the cones (mine are 3″ in diameter)
- Black candy melts – the ‘glue’ that holds it all together
- Halloween sprinkles – for adding creepy color to our witch hats
- M&Ms – one of the sweet surprises inside
- Autumn Mix Candy – the other part of the surprise inside
INSTRUCTIONS TO MAKE CANDY-FILLED WITCH HATS
Alright my kitchen witches, now that we’ve gathered our magical components, it’s time to fire up the cauldron and follow the step-by-step spell below to brew up a batch of these haunting Halloween treats!
Pro Tip
When working with candy melts or melted chocolate, you will want to work quickly so the melted candy does not set before you are finished.
STEP ONE: MELT THE CANDY MELTS
- Using either a microwavable bowl, candy melting pot, or double boiler, begin by melting one quarter to a half cup of the candy melts following the package directions. It is ready when it is smooth without any lumps and easily flows off a spoon. See my Tips for Success below.
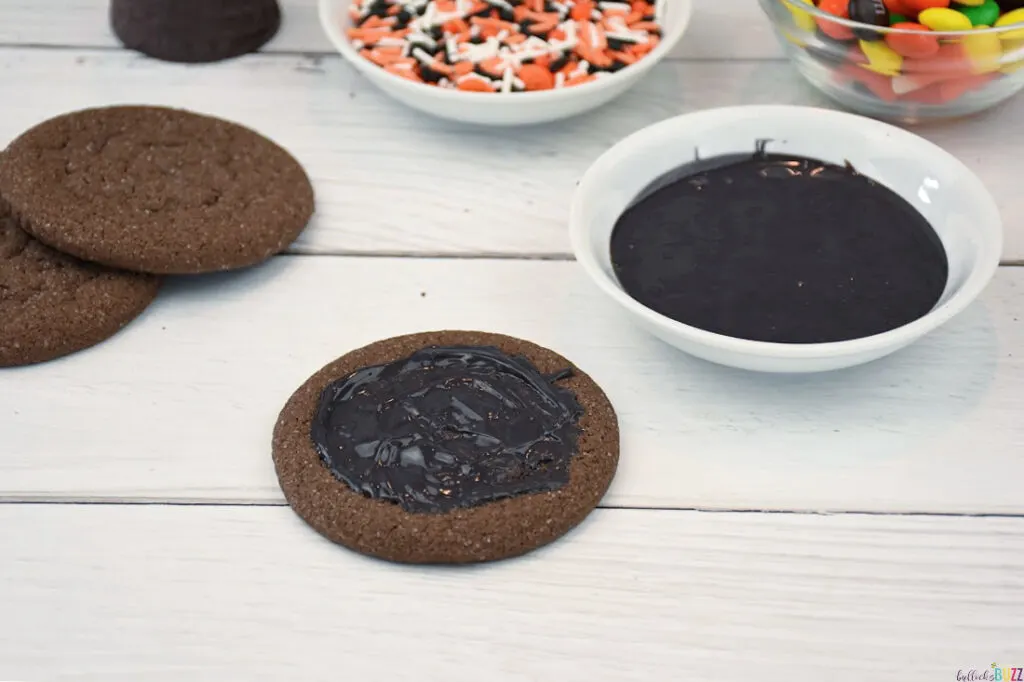
STEP TWO: ADD MELTED CANDY TO COOKIE BASE
- Place a cookie top-side up.
- Using the backside of a spoon, a food-safe paintbrush, or an offset spatula, apply a small amount of melted candy to the center of the cookie in a circular shape. This is the ‘glue’ that will hold the cone in place.
- Make sure your circle is large enough so the open side of the cone fits inside it.

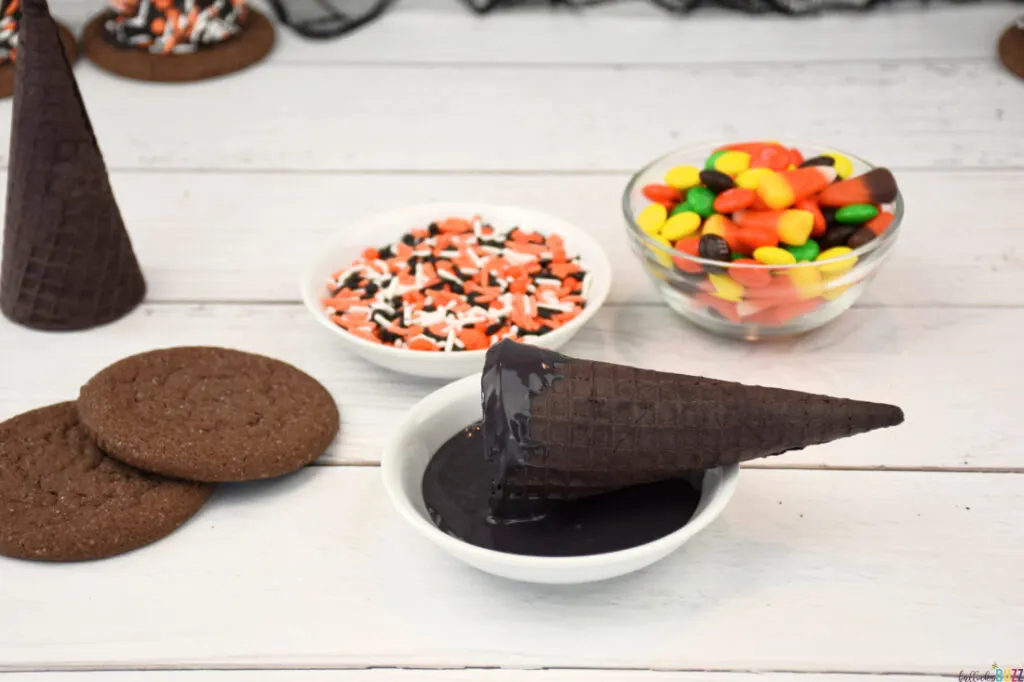
STEP THREE: ADD MELTED CHOCOLATE TO CONE
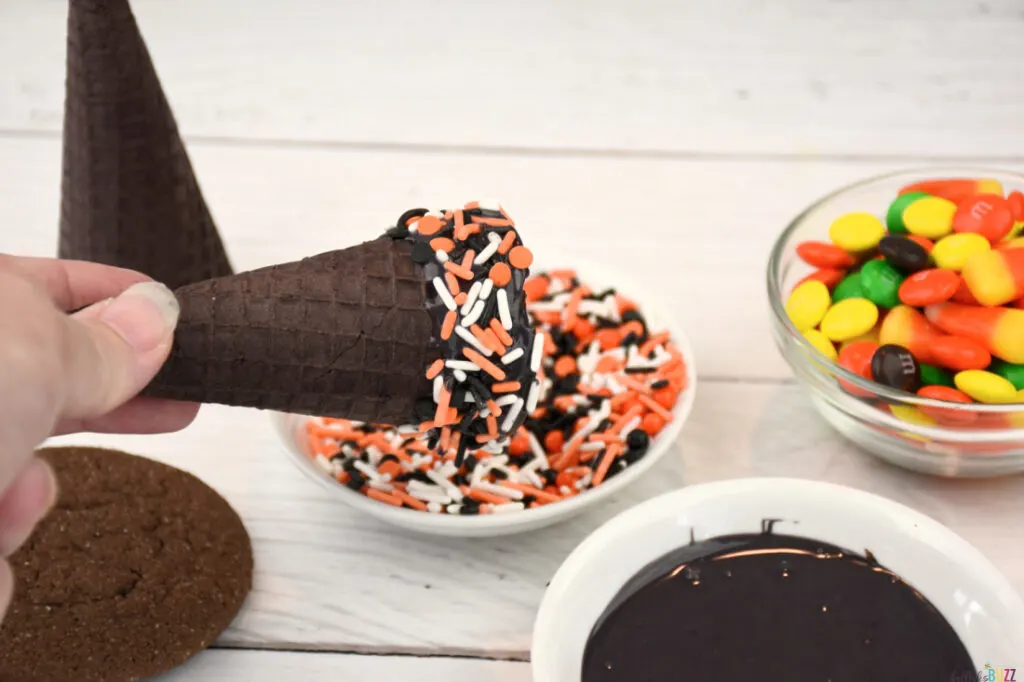
- Next, holding the cone at a slight angle, roll the open end in the melted candy so it coats the sides and the very bottom.
- Gently tap off any excess candy.
Pro Tip
Use the spoon to help remove the excess chocolate before adding sprinkles.

STEP FOUR: ADD SPRINKLES
- Then, again holding the ice cream cone at a slight angle, either roll it in the sprinkles or use your fingers to cover the chocolate with sprinkles. Make sure they cover the sides but not the bottom lip of the cone.

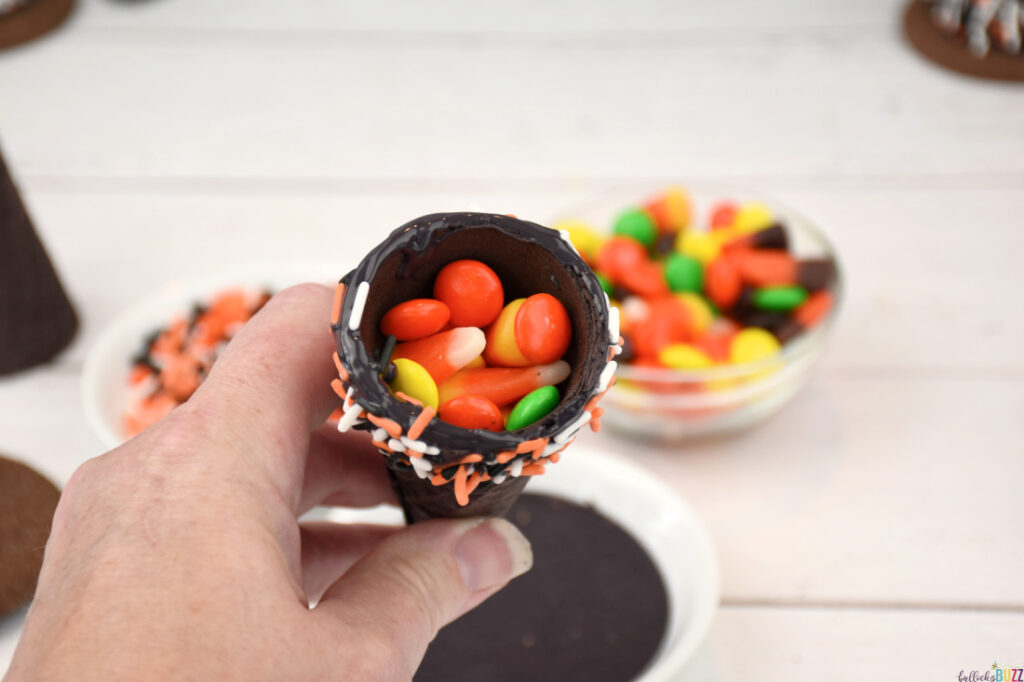
STEP FIVE: ADD THE CANDY
- Holding the cone upside down, fill it almost to the top with the Autumn Mix and M&M candies.

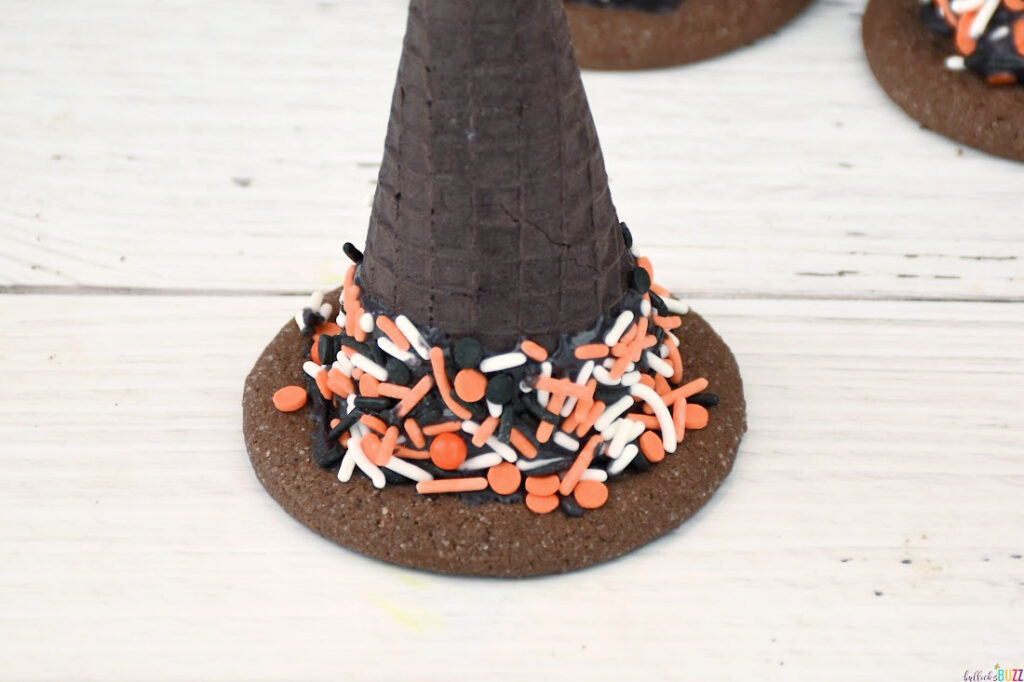
STEP SIX: ADDING THE COOKIE
- Now take the cookie and place it chocolate-side down over the mouth of the cone, first removing any sprinkles that may come between the lip of the cone and the cookie. Remember to make sure the mouth of the cone is fully within the circle of melted chocolate on the cookie.
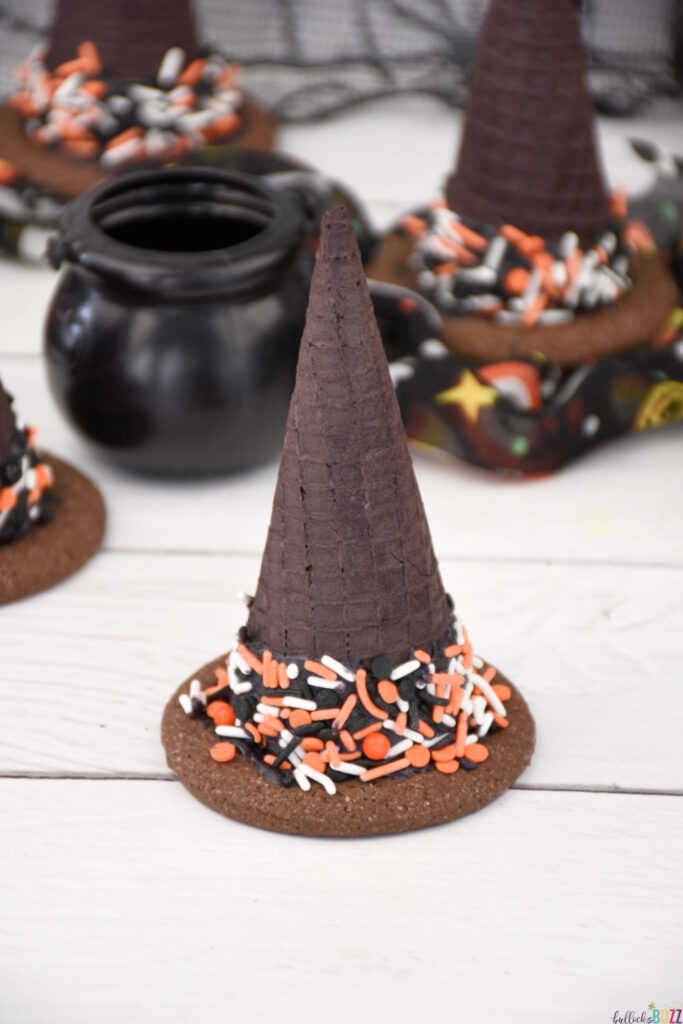
- Next, carefully flip the cookie and cone upright (so it resembles a witch hat) and set your candy-filled witch hat to the side.
- Allow the chocolate to completely set – at least 30 minutes – before serving.
- Repeat the above spell with the remaining cones.

And there you have it – your Halloween Candy-Filled Witch Hats are ready to cast their spookalicious spell, bewitching all who dare to taste them!


TIPS FOR SUCCESS
Crafting these Candy-Filled Witch Hats is similar to brewing a cauldron of magic potions, and every kitchen witch needs a few tricks up their sleeve to ensure success. Here are a few enchanting tips to ensure your whimsical witchy morsels turn out spooktacularly delightful!
- Melt Candy Carefully. When melting your candy, no matter which method you use, pay close attention to the package instructions. Also, if using a microwave, stop melting when the candy still has a few small lumps, then stir until those dissolve. Overheating and over-stirring can cause the candy to become ruined or dull. If using a double boiler, be very careful to not let any moisture touch the candy as it will cause it to seize.
- Ensure the Hat is Secure. When attaching the cookie to the cone, ensure that the open end of the cone fits completely within the circular pool of melted chocolate on the cookie. If needed, add a little more melted chocolate to the cookie first to ensure a secure bond.
- Get Creative. Using your creativity is what makes crafting Halloween treats so fun! So get creative with your witch hat decorations. Try using different types of sprinkles, or another fun Halloween color. You could use a piping bag to add frosting in fun Halloween colors, or even add some fondant. Or try using different cookies for the hat brim. Make it fun!
- Safety First. These Halloween cookies are perfect for little witches and warlocks to make! Just ensure that safety comes first when melting and working with the hot, melted chocolates.


FAQs:
What type of candy should I use to put inside these ice cream cone witch hats?
I like to use Halloween candy that you typically see around this time of the year. This includes candy corn, candy pumpkins, and regular M&Ms. But you can add whatever you want as long as it fits inside. Think Reese’s Pieces, candy eyes, gummy worms, Peanut M&Ms, Skittles, miniature chocolate chips, mini marshmallows, etc. Get creative with it!
Can I Use Homemade Cookies for these Halloween Witch Hat Treats?
Yes, you can use your favorite homemade cookie recipe if you prefer. Store-bought cookies, however, make the process easier and faster. If you do choose to make the cookies, remember that they need to be wide enough to fit over the mouth of the ice cream cone with enough around the edges to form the brim of the witch hat. The fudge cookies I used are 3 inches in diameter.
Can I make these Candy-Filled Witch Hats in advance?
Absolutely! While you can prepare these fun Halloween treats a day or two in advance, just be sure to store them in an air-tight container so they stay fresh.

Can I Use Chocolate Instead of Candy Melts?
Yes, you can use chocolate instead of candy melts. I would use chocolate chips as the melting chocolate as opposed to bars. And keep in mind that it may take the chocolate a bit longer to set than the candy melts.
If I were using chocolate, I would probably use semi-sweet chocolate chips since they are not as sweet as milk chocolate but still have a delicious chocolate flavor. Milk chocolate chips are another option, but remember, they are much sweeter. Dark chocolate would also work and would give you a richer flavor.
Pro Tip
Adding a slice of bread to the airtight container can help maintain the ice cream cone’s ‘softness’.
If you have any more questions about these ice cream cone witch hats, feel free to drop them below and I’ll be sure to answer them as soon as possible!
HOW TO STORE HALLOWEEN CANDY-FILLED WITCH HATS
If you make these adorable Witch Hats in advance, or if you have any leftovers, you can store them easily. Carefully place them in an airtight container, taking care not to overcrowd or stack them.
Place the container in a cool, dry place away from direct sunlight and any sources of heat. Room temperature is fine, there is no need to refrigerate them.
With proper storage, your Ice Cream Cone Witch Hats will be ready to eat for up to a week or so.

WHY YOU WILL LOVE THESE SIMPLE TREATS FOR HALLOWEEN
There are so many reasons why these Candy-Filled Halloween Witch Hats will captivate your senses!
- They’re Eerily Easy to Make: Brewing potions and other concoctions need not be complicated and these witchy treats are a breeze to conjure. Whether you’re a novice or a seasoned kitchen witch, this spellbinding recipe is a cinch, allowing you more time to enjoy the spooky season!
- They Are Perfect for Parties: Got a school party coming up? Or perhaps you’re throwing a Hocus Pocus party? Whatever the occasion, these witch hat surprise cookies will have them cackling with delight. Young witches and warlocks adore them for their bewitching looks and sweet surprise inside. Plus they’re a great Halloween party activity! Simply set out everything needed, and then call the coven to gather around so you can show them how to craft their own witch hat cookies. Just make sure an adult supervises when using the hot melted candy
- Witch Hats are Terrifyingly Tasty: Beyond their spine-tingling appearance, these witch’s hats are filled with flavor. With Oreo-flavored cones, rich chocolate, sweet sprinkles, and a hidden treasure trove of candies, it’s an explosion of flavor that’ll transport everyone into the Halloween spirit.
- Family Fun Making Ice Cream Cone Witch Hats: Halloween is all about making magical memories. So why not make these candy-filled witch hats a family tradition? Get everyone involved, from little witches and warlocks to the grown-up cauldron-stirrers. It’ll be a blast of sprinkles, laughter, and spooky vibes!
These Candy-Filled Halloween Witch Hats are everything you need for an enchanted Halloween. They’re easy to make, a hit at parties, bursting with sweet flavor, and perfect for family fun. And the best part of all? They bring joy and magic into any spooky festivity!

CONCLUSION
And there you have it my sweet conjurers of confectionary delight! You’ve successfully crafted some of the most fun Halloween treats ever!
I hope your Halloween season is filled with laughter, mischief, and sweetness. And remember, there is always room for more Halloween delights so be sure to check back for a few more spellbinding surprises I have planned!
Until next time my coven of witches!


MORE WITCH-THEMED HALLOWEEN RECIPES
Looking for some more wickedly witchy Halloween treats? Check out these other spooktacular recipes that will cast a spell on every ghost, ghoul, and goblin’s taste buds!


LIKE IT? LOVE IT? PLEASE SHARE THIS CANDY-FILLED WITCH HATS RECIPE!
Did you make these wonderfully witchy Candy-Filled Watch Hats for Halloween? If so, I’d love to see how they turned out! I absolutely adore seeing your own take on my recipes!
Tag me on Instagram @bullocksbuzz or using #bullocksbuzz and share a photo of your wicked creations!
Be sure to save this post either by clicking on that little heart over there to your right or by pinning it on Pinterest. Then share with your friends and family by clicking the share buttons above the post title, too!
And, if you really liked this Halloween recipe, comment and leave me a ⭐⭐⭐⭐⭐ rating on the printable recipe card below!
And finally, don’t forget to follow us on Pinterest, Facebook, and Instagram!

Halloween Popcorn Ball Witches Printable Recipe Card
Candy-Filled Witch Hats for Halloween


Elevate your Halloween celebration with these Candy-Filled Witch Hats! A delightful, no-bake treat that's perfect for parties and more.
Ingredients
- 6 Oreo Ice Cream Cones - (Can't find them? Use Black Color Mist to color plain sugar cones).
- 6 Fudge cookies or other dark brown cookies (at least 3" in diameter)
- ¼ - ½ cup Black candy melts
- Halloween-colored sprinkles
- 1 bag M&Ms
- 1 bag Autumn Mix Candy
Instructions
Step One: Melt Candy
- Using either a microwave-safe bowl, candy melting pot, or double boiler, melt the candy melts following the package directions.
Step Two: Prepare the Bottom of the Hat
- Place a cookie top-side up.
- Use the backside of a spoon, offset spatula, or food-safe paintbrush, and add a small amount of melted candy in the middle of the cookie making a circular shape.
- Make sure the circle is large enough so the open side of the cone fits inside it.
Step Three: Decorate the Cone
- Holding the cone at a slight angle, roll the open end in the melted candy so it coats the sides and very bottom.
- Gently tap off any excess candy or use the spoon to carefully scrape it off.
- Again holding the ice cream cone at a slight angle, either roll it in the sprinkles or use your fingers to cover the chocolate with sprinkles. Make sure the sprinkles cover the sides of the cone but not the bottom lip.
Step Four: Fill with Candy
- Holding the cone upside down, fill it almost to the top with the candy.
Step Five: Putting It All Together
- Take the cookie and place it chocolate-side down over the mouth of the cone, first making sure to remove any sprinkles that may come between the lip of the cone and the cookie.
- Be sure that the mouth of the cone is fully within the circle of melted chocolate on the cookie.
- Holding the cookie against the cone, carefully flip the cookie and cone upright (so it resembles a witch hat) and set it to the side.
- Allow it to set for about 15 to 30 minutes.
- Repeat the above spell with the remaining cones.
Notes
- If using a microwave to melt the candy, stop melting when the candy still has a few small lumps, then stir until those dissolve. Overheating and over-stirring can cause the candy to become ruined or dull.
- If using a double boiler, be very careful to not let any moisture touch the candy as it will cause it to seize.
Nutrition Information:
Yield:
6Serving Size:
1 hatAmount Per Serving: Calories: 478Total Fat: 19gSaturated Fat: 11gTrans Fat: 0gUnsaturated Fat: 7gCholesterol: 53mgSodium: 180mgCarbohydrates: 70gFiber: 2gSugar: 53gProtein: 6g
Nutritional information is automatically calculated with ingredients and serving size and may not be accurate. Please always double check with your own nutritional apps as well.